¶ Position Calibration
¶ Overview
Position Calibration calibrates the relationship between the camera, print position, and the printer's mechanical coordinate system. It helps ensure that the design position shown in the preview matches the actual printed result.
Position Calibration includes three calibration methods:
| Calibration method | Main purpose | When to use |
|---|---|---|
| Print-to-Camera Calibration | Corrects the offset between the camera preview and the actual print position. | Use first when the print position is offset. |
| Stereo Camera Calibration | Recalibrates the spatial relationship between the cameras. | Use when Print-to-Camera Calibration cannot be completed or when prompted by the system. |
| Origin Calibration | Recalibrates the printer's mechanical origin. | Use during initial setup, after related components have been replaced, or when prompted by the system. |
In most cases, use Print-to-Camera Calibration first. This method resolves most print position offset issues.
¶ Choose a Calibration Method
¶ The printed result does not match the preview position
Run Print-to-Camera Calibration.
This is the most commonly used calibration method and is recommended for most print position offset issues.
¶ Print-to-Camera Calibration cannot be completed
Follow the on-screen instructions to run Stereo Camera Calibration.
After Stereo Camera Calibration is complete, the system will continue with Print-to-Camera Calibration to complete the print position correction.
¶ The device origin is abnormal or the system asks you to recalibrate it
Run Origin Calibration.
Origin Calibration is typically used during initial setup, after related mechanical components have been adjusted, or when prompted by the system.
Note: Unless the system specifically asks you to run Origin Calibration, do not use it to resolve general print position offset issues.
¶ Print-to-Camera Calibration
¶ Overview
Print-to-Camera Calibration corrects the offset between the camera preview position and the actual print position.
If the design is correctly positioned on the Alignment page but the printed result is shifted as a whole, run this calibration first.
¶ When to use it
Use Print-to-Camera Calibration when:
- The printed result is offset from the preview position.
- The artwork cannot be printed accurately on the target area of the object.
- Stereo Camera Calibration has just been completed.
- The system asks you to run Print-to-Camera Calibration.
¶ How to use it
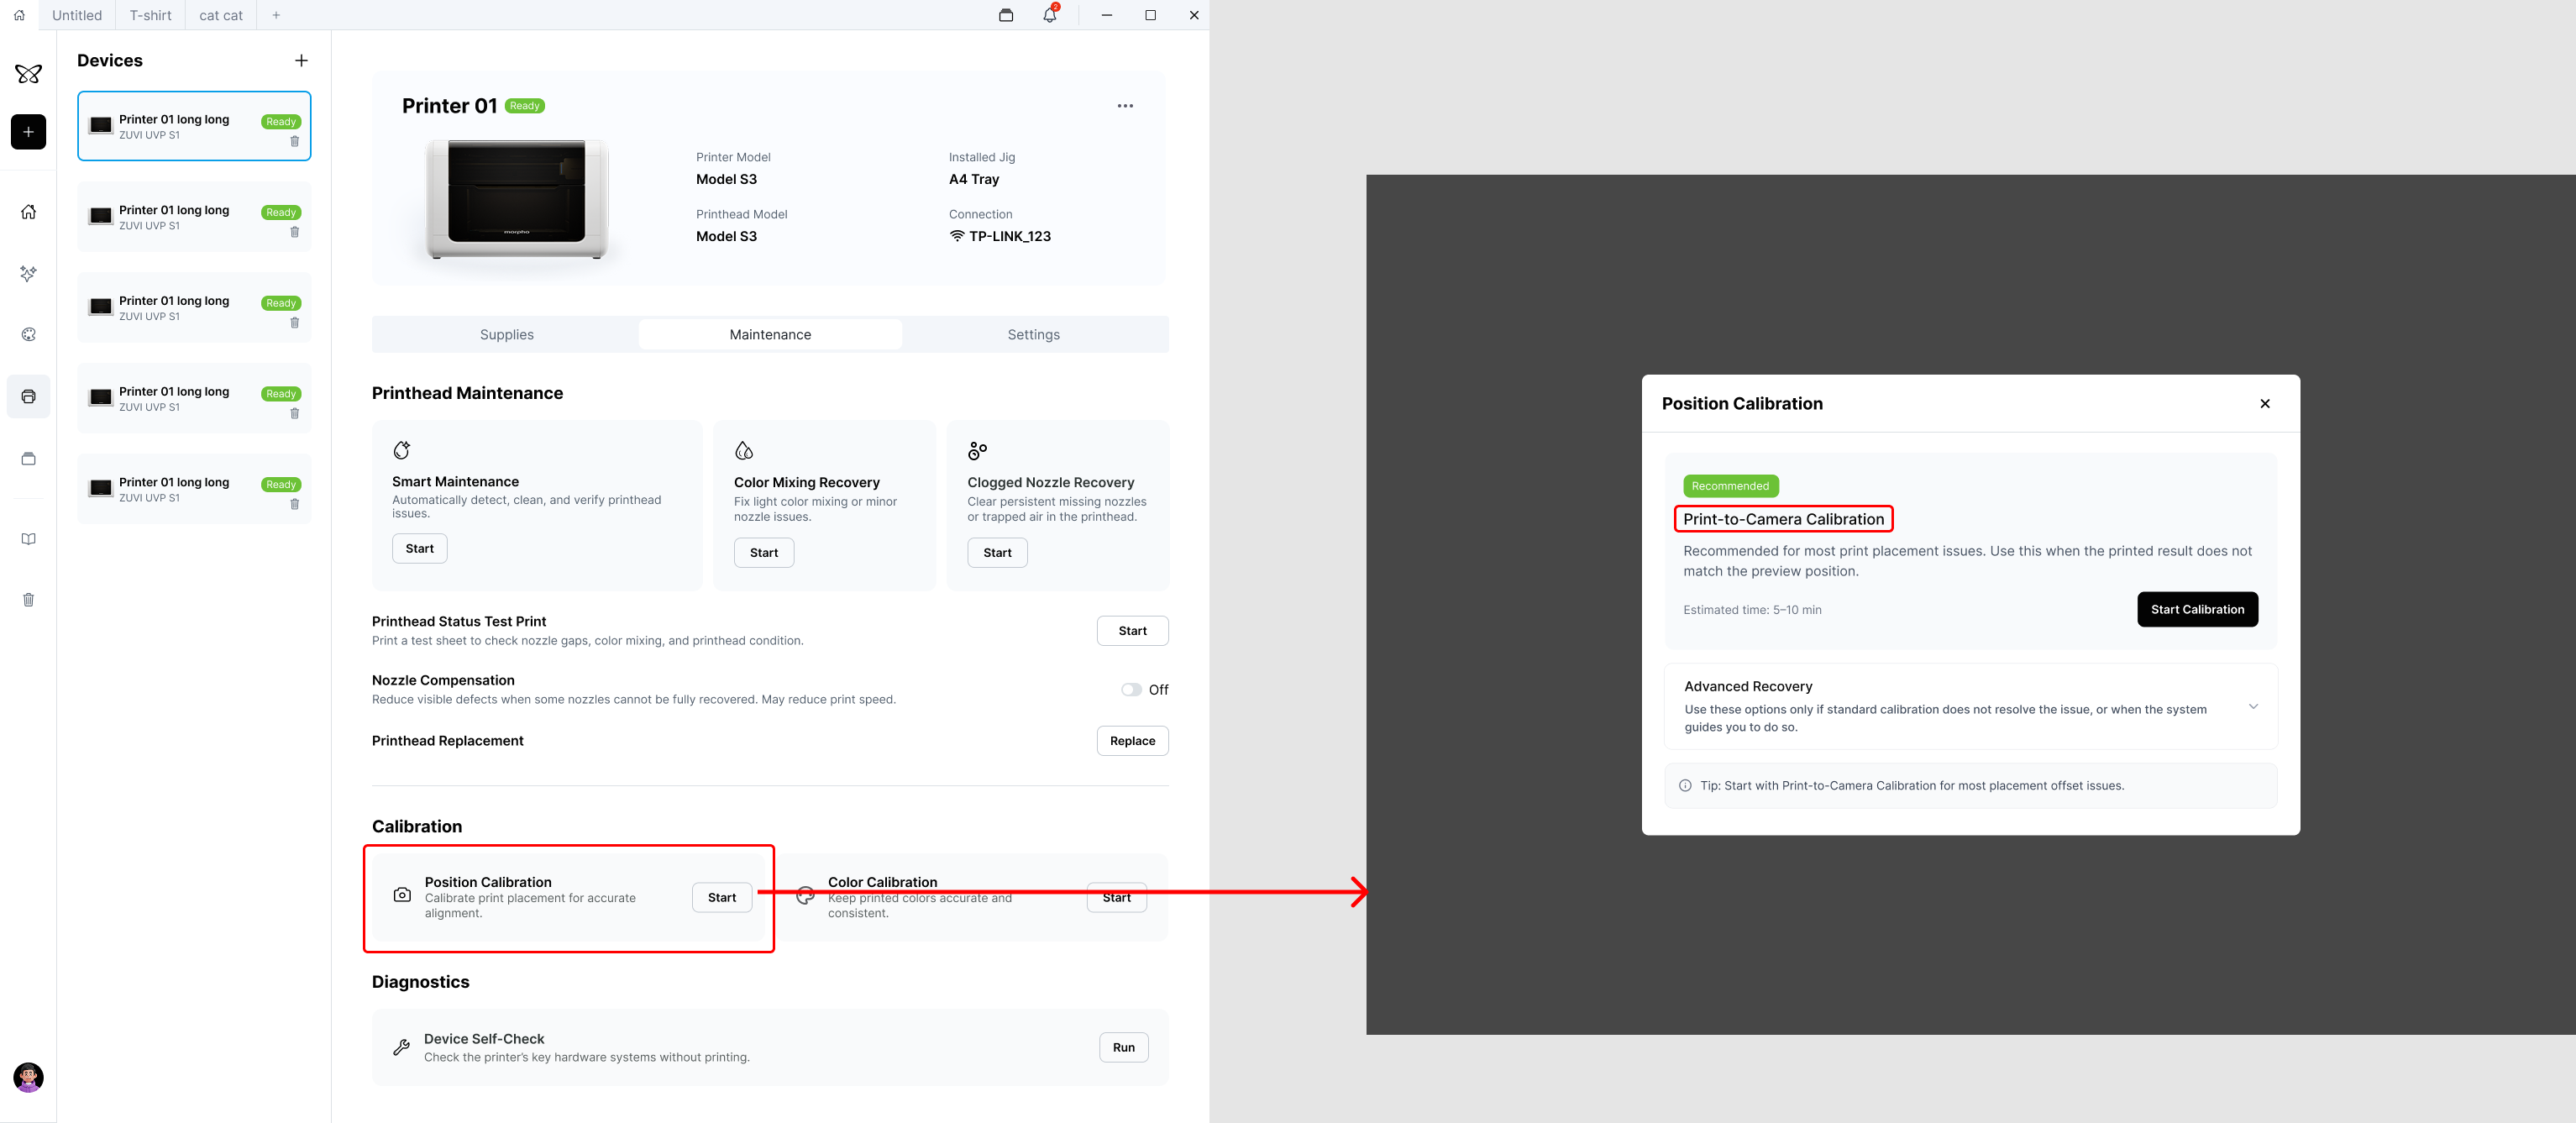
- Go to Device Center > Calibration > Position Calibration.
- Select Print-to-Camera Calibration.
- Follow the on-screen instructions to place and secure the calibration paper.
- Start calibration.
- The printer prints the calibration pattern, then captures and analyzes it with the camera.
- After calibration is complete, remove the calibration paper.
¶ Notes
- Do not move the calibration paper during calibration.
- Make sure the paper is flat and securely fixed.
- After calibration is complete, run Alignment again before printing.
- If calibration cannot be completed, follow the on-screen instructions to run Stereo Camera Calibration.
¶ Stereo Camera Calibration
¶ Overview
Stereo Camera Calibration recalibrates the spatial relationship between the cameras. It provides an accurate visual reference for object recognition, position measurement, and Print-to-Camera Calibration.
This is an advanced calibration method. General print position offset issues usually do not require running it directly.
¶ When to use it
Use Stereo Camera Calibration when:
- Print-to-Camera Calibration cannot be completed.
- The spatial relationship between the cameras is abnormal.
- A camera or related component has been serviced, replaced, or adjusted.
- The system asks you to run Stereo Camera Calibration.
¶ How to use it
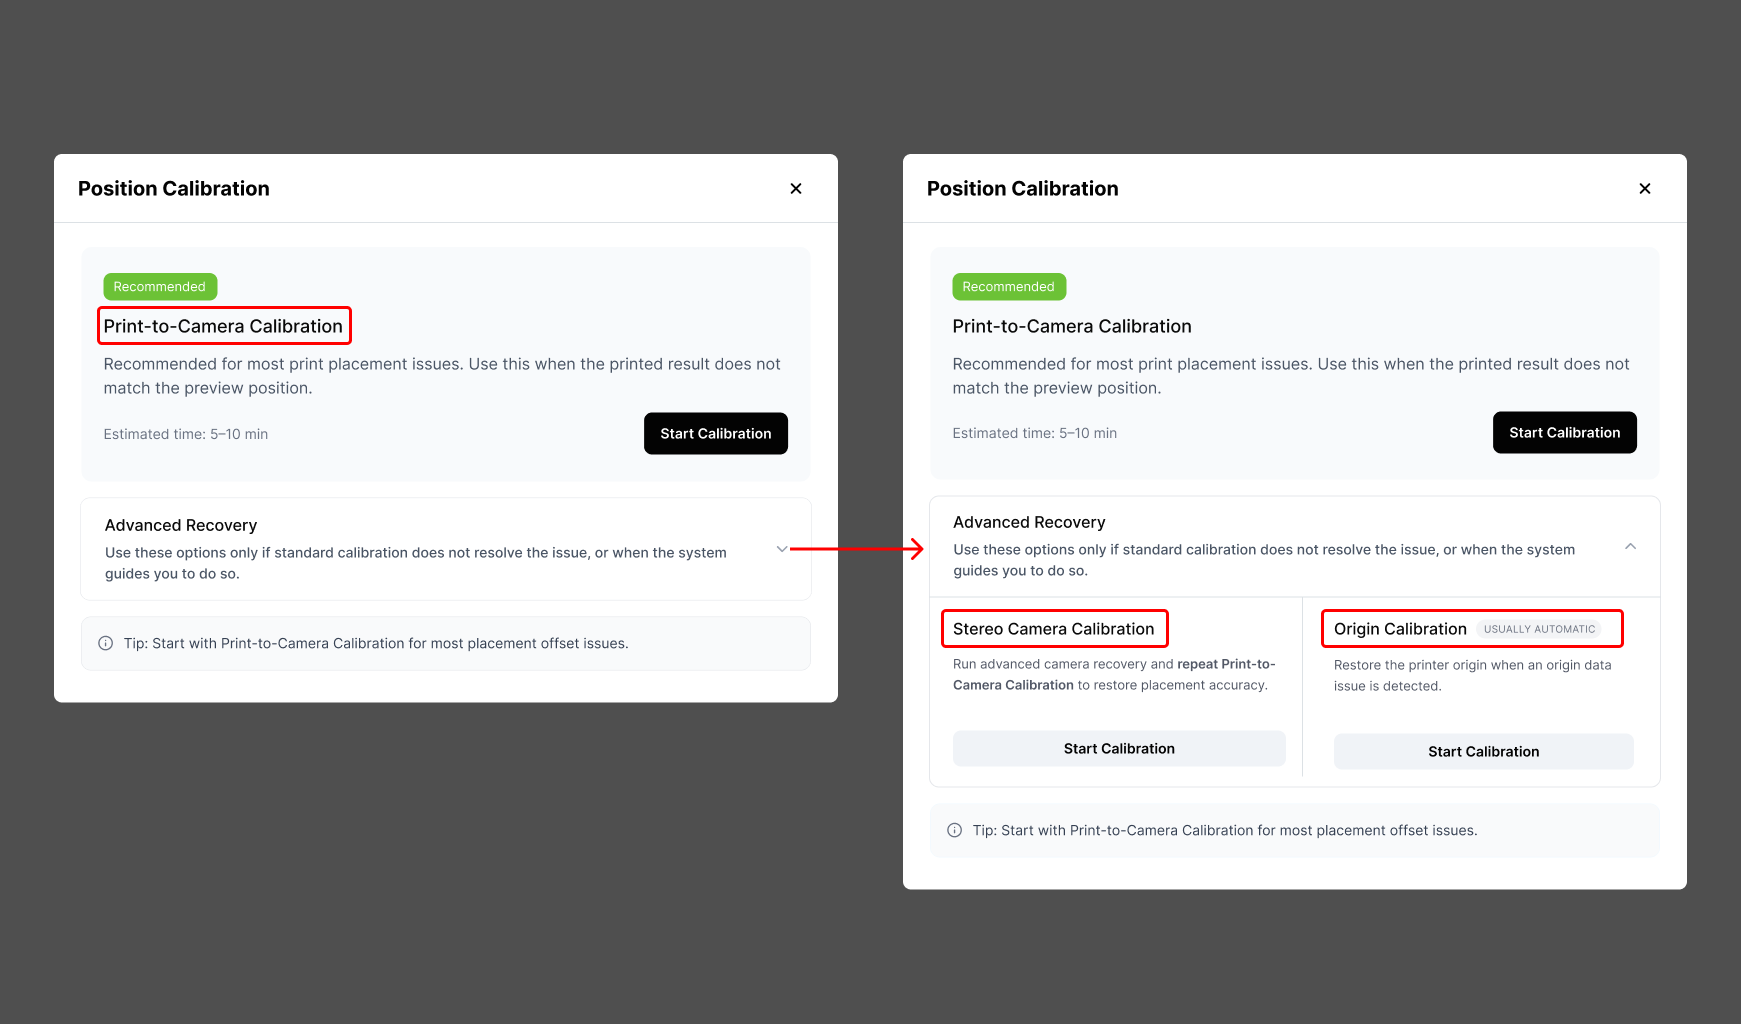
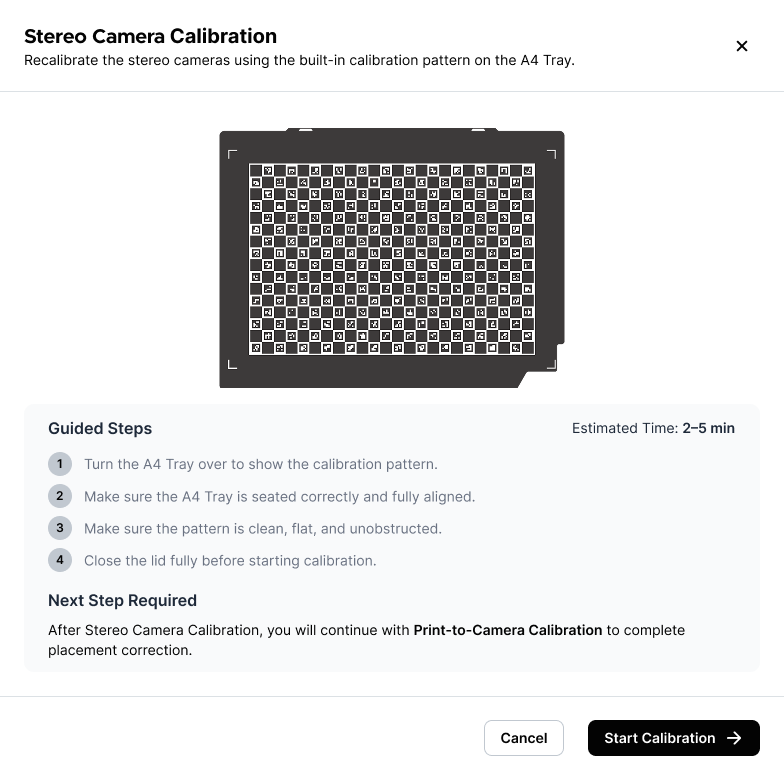
- Go to Device Center > Calibration > Position Calibration.
- Select Stereo Camera Calibration.
- Follow the on-screen instructions to prepare and place the calibration material.
- Start calibration.
- The printer captures images and recalculates the spatial relationship between the cameras.
- After Stereo Camera Calibration is complete, the system will continue with Print-to-Camera Calibration.
¶ Notes
- Do not move the calibration material or open the printer during calibration.
- Make sure there are no unrelated objects in the calibration area.
- Stereo Camera Calibration does not replace Print-to-Camera Calibration.
- After Stereo Camera Calibration, Print-to-Camera Calibration must still be completed to correct the final print position.
¶ Origin Calibration
¶ Overview
Origin Calibration determines the printer's mechanical origin. It provides a unified coordinate reference for platform movement, camera positioning, and print position control.
This calibration is typically used during initial setup or after the mechanical position of the printer has changed.
¶ When to use it
Use Origin Calibration when:
- The printer is being installed or initialized for the first time.
- The system cannot correctly identify the mechanical origin.
- Related motion components have been serviced, replaced, or adjusted.
- The system asks you to run Origin Calibration.
¶ How to use it
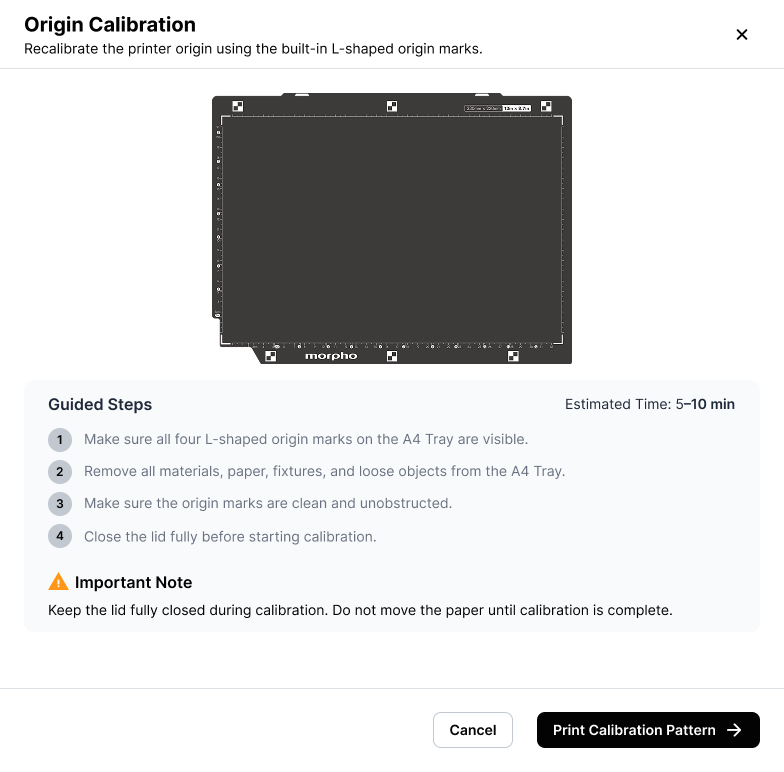
- Go to Device Center > Calibration > Position Calibration.
- Select Origin Calibration.
- Follow the on-screen instructions to clear the printer interior and prepare for calibration.
- Start calibration.
- The printer moves automatically and recalculates the mechanical origin.
- Follow the on-screen instructions to complete any subsequent position calibration steps.
¶ Notes
- Before calibration starts, make sure there are no objects or tools within the printer's motion range.
- Do not touch moving components during calibration.
- Origin Calibration is not used to resolve general print position offset issues.
- If prompted by the system after Origin Calibration is complete, continue with Stereo Camera Calibration or Print-to-Camera Calibration.