¶ Left menu bar - Effects Overview
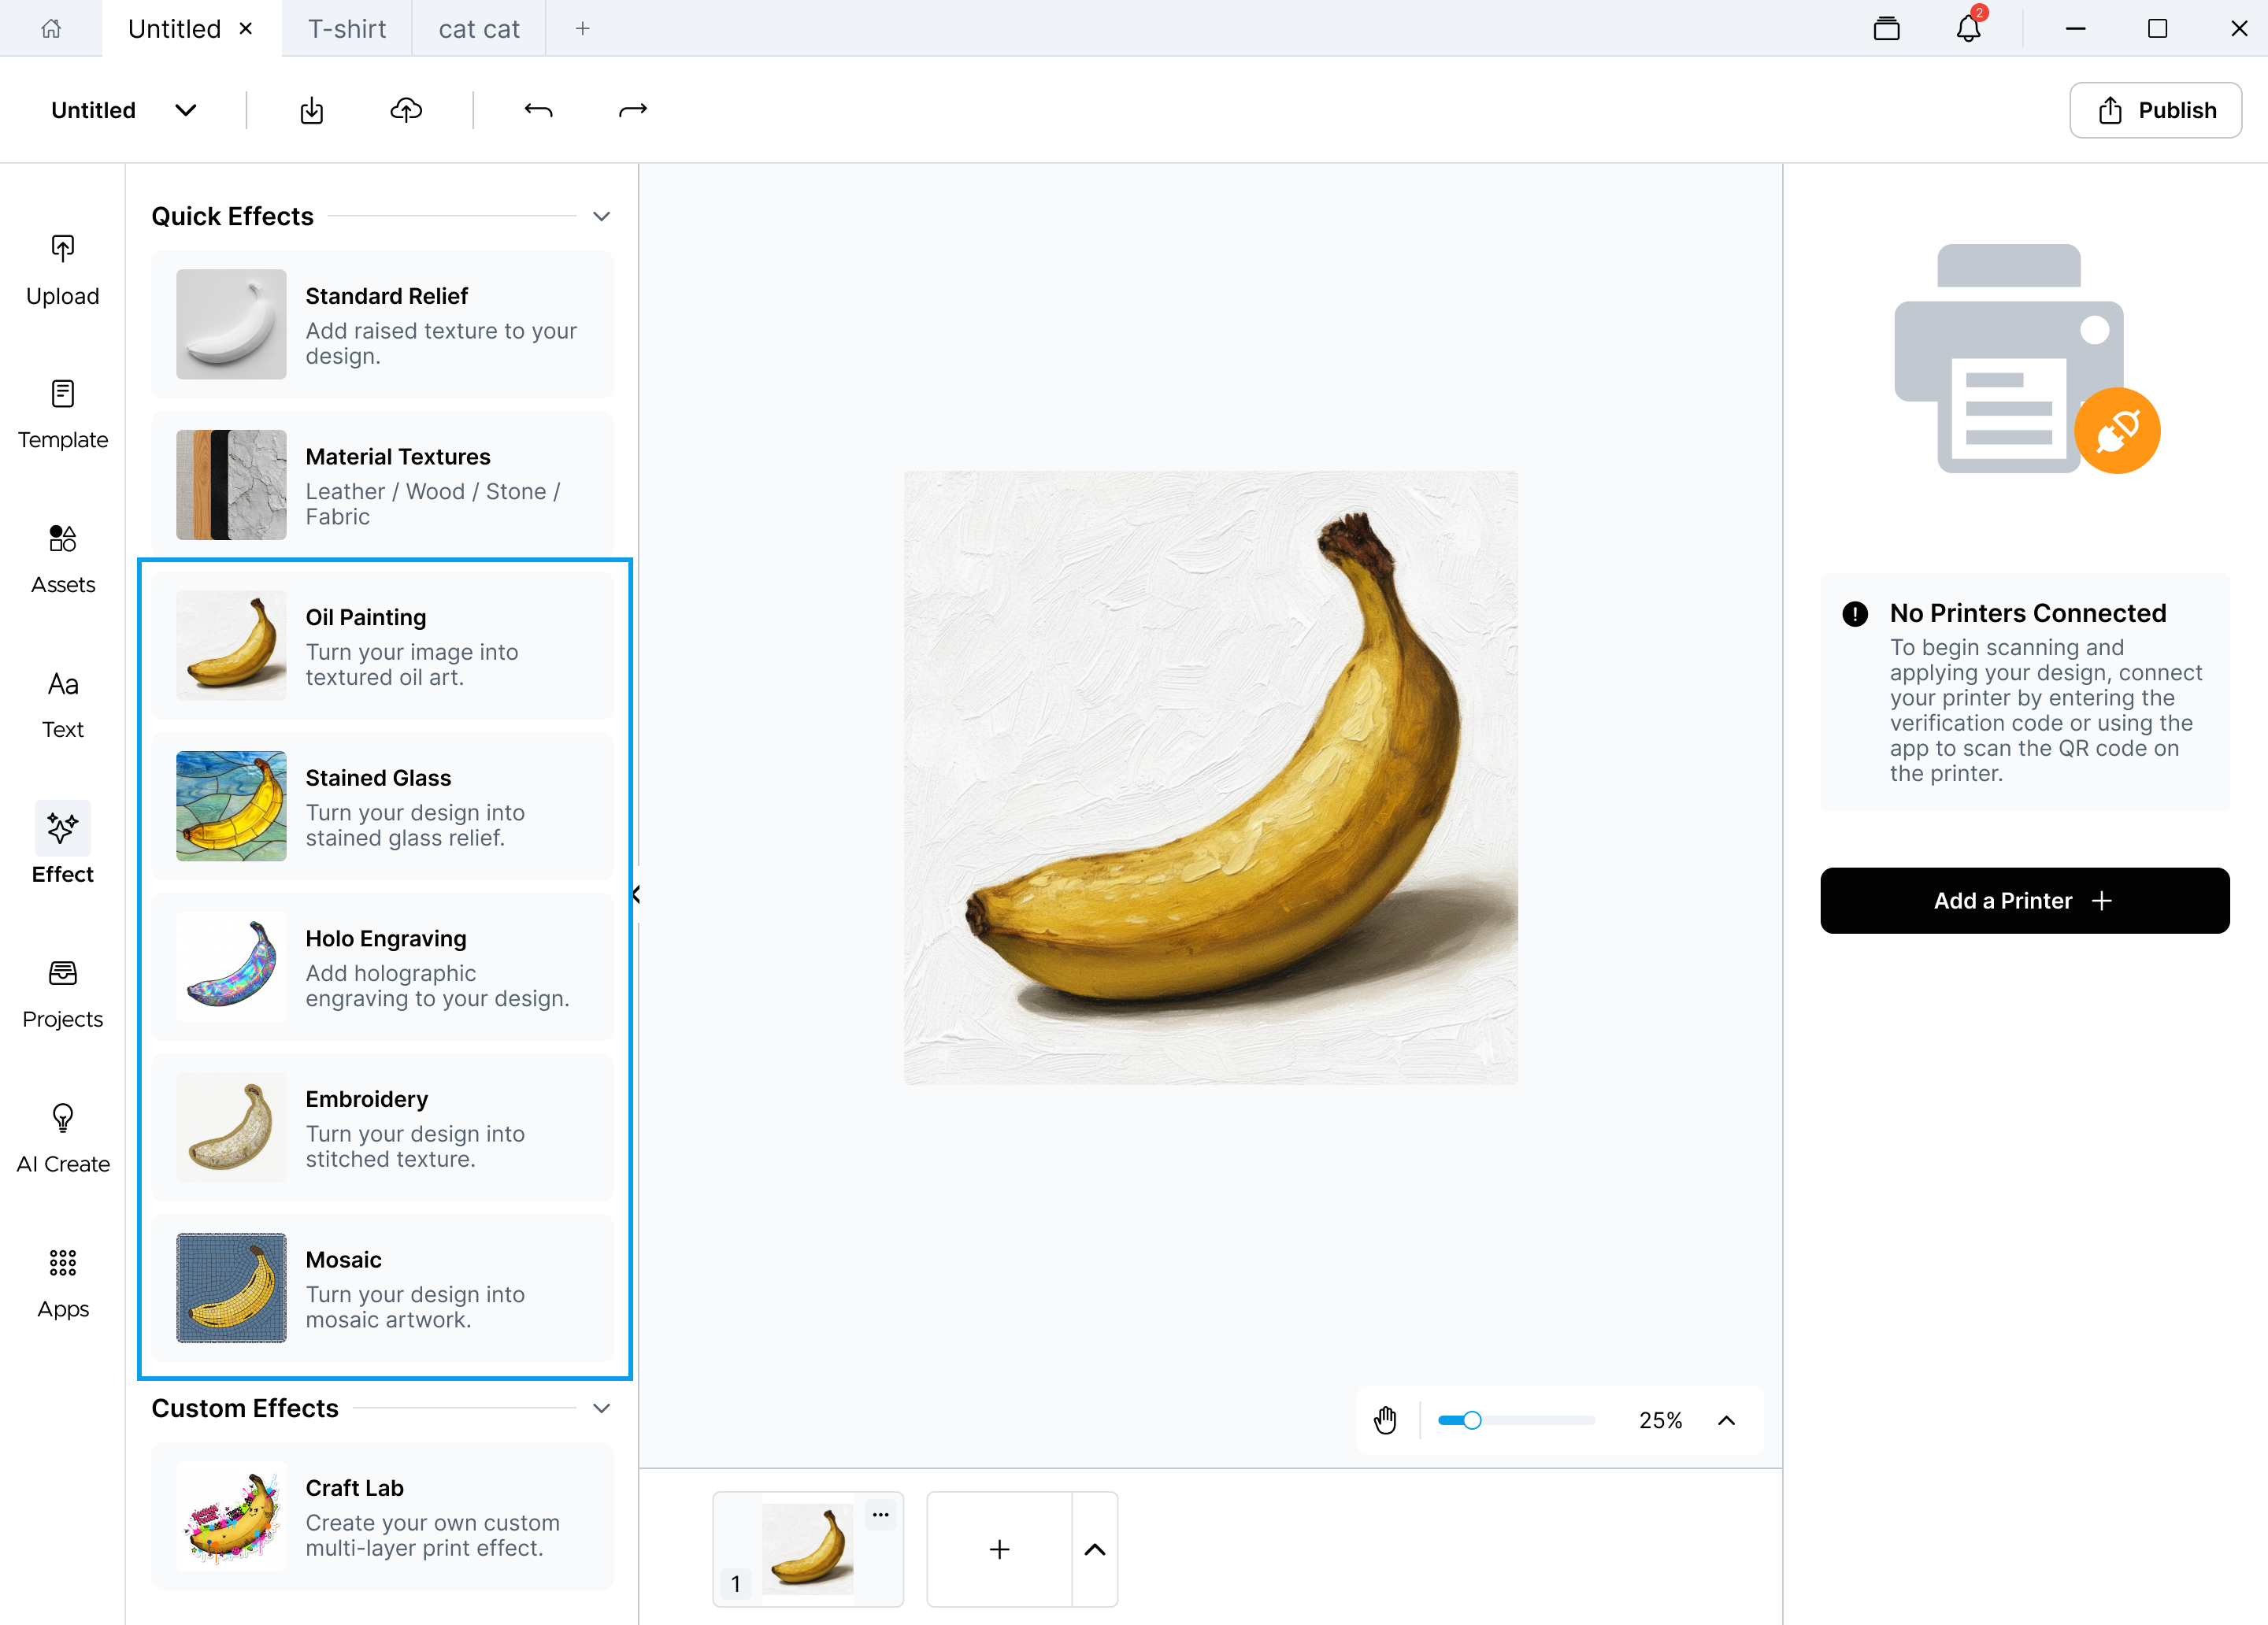
This manual explains how to use Effects after creating or editing a design on the 2D canvas. Effects help you turn a flat image into a printable UV effect, including raised relief, material textures, styled images, and advanced custom print layers.
¶ Open Effects from the 2D Canvas
After adding an image, text, or design to the 2D canvas, open the Effect panel from the left toolbar.
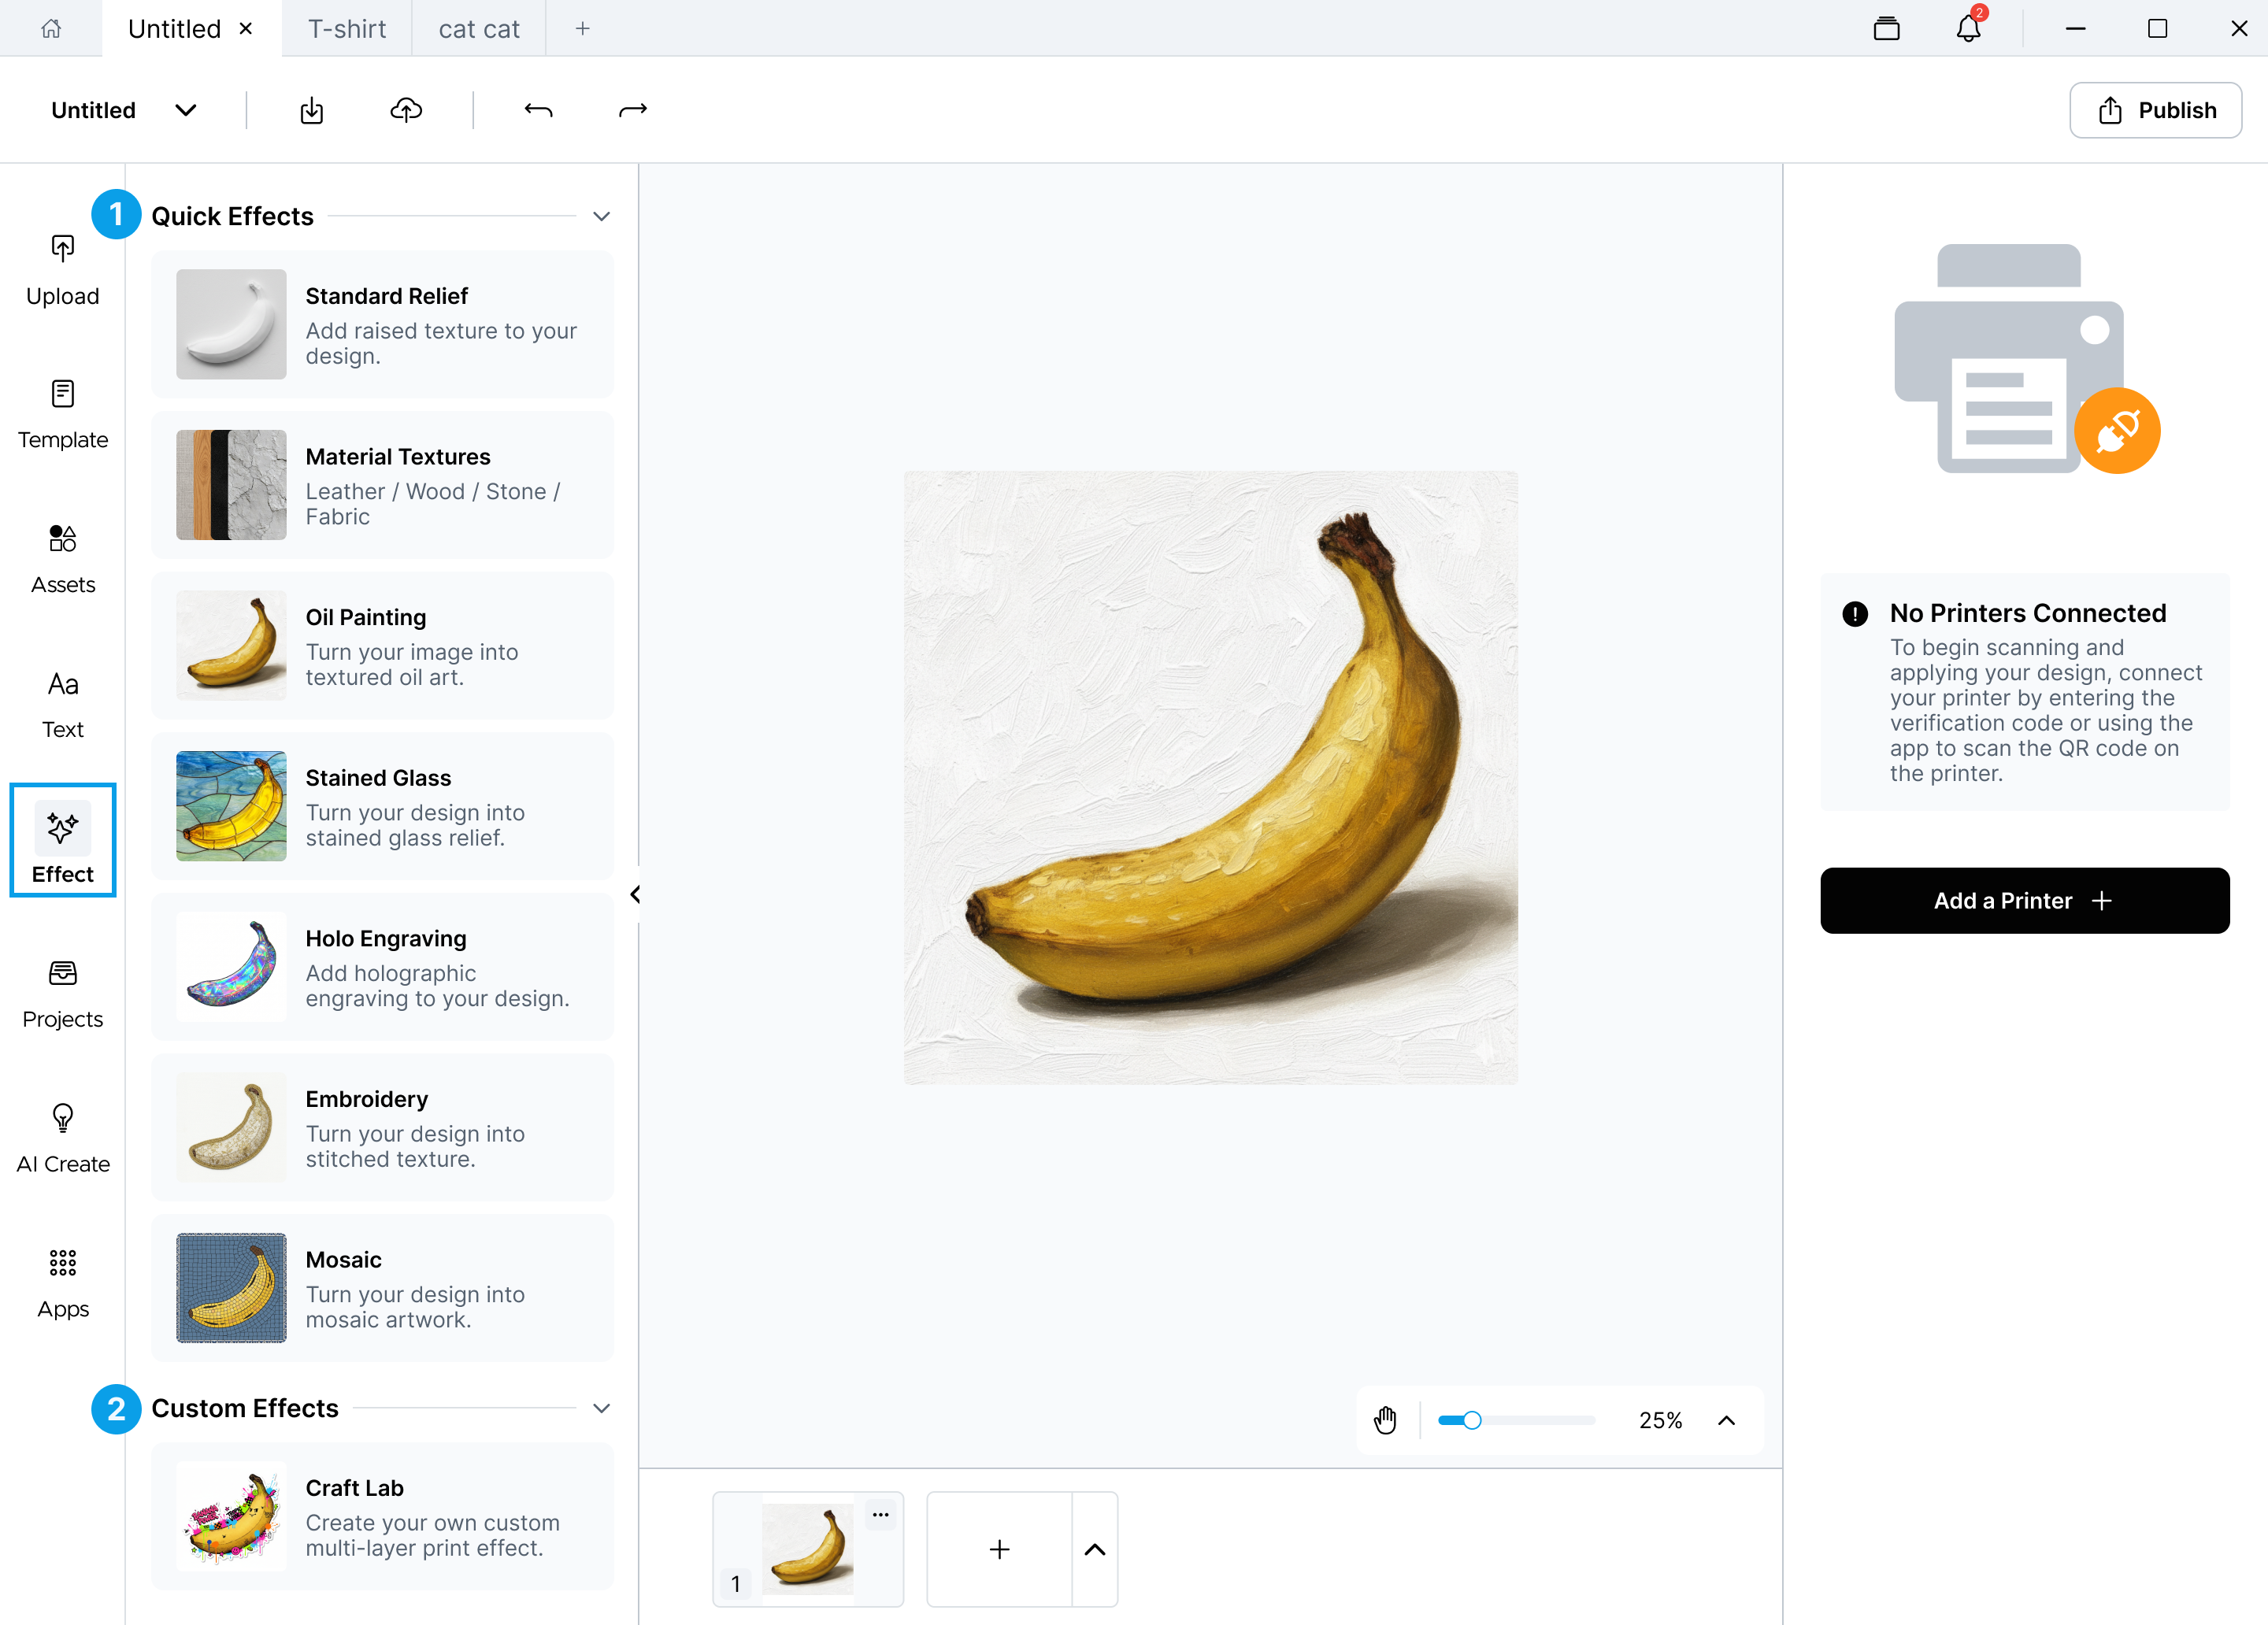
The Effects panel contains two main sections:
| Section | Description |
|---|---|
| 1. Quick Effects | Ready-to-use effects for common print results, such as relief, material texture, oil painting, stained glass, holo engraving, embroidery, and mosaic. |
| 2. Custom Effects | Advanced tools for building custom multi-layer print effects. |
¶ Choosing the Right Effect
Use this guide to decide which effect to use:
| Effect | What It Does | Best For |
|---|---|---|
| Relief Texture | Add printable raised depth to your current design. | Simple raised texture, logos, illustrations, photos, text, etc. |
| Material Textures | Add realistic material-style surface textures to your design. | Leather, wood, stone, fabric-like surfaces |
| Oil Painting | Turns your image into an oil-painting style and creates printable relief. | Portraits, pets, landscapes, artistic images |
| Stained Glass | Turns your image into a stained glass style with printable raised relief. | Decorative art, colorful illustrations, bold shapes |
| Holo Engraving | Creates a holographic engraving style. | Decorative holographic-style artwork |
| Embroidery | Turns your image into an embroidery-style print effect. | Fabric-like, stitched, craft-style artwork |
| Mosaic | Turns your image into a mosaic-style print effect. | Tile-like artwork, geometric decoration |
| Craft Lab | Manually configure print layers and relief structure. | Advanced users, custom print layers, custom depth maps |
¶ Relief Texture
Relief Texture adds raised texture to your existing design. Use it when you want the printed result to have physical height or tactile surface detail.
¶ Relief Texture Workflow
-
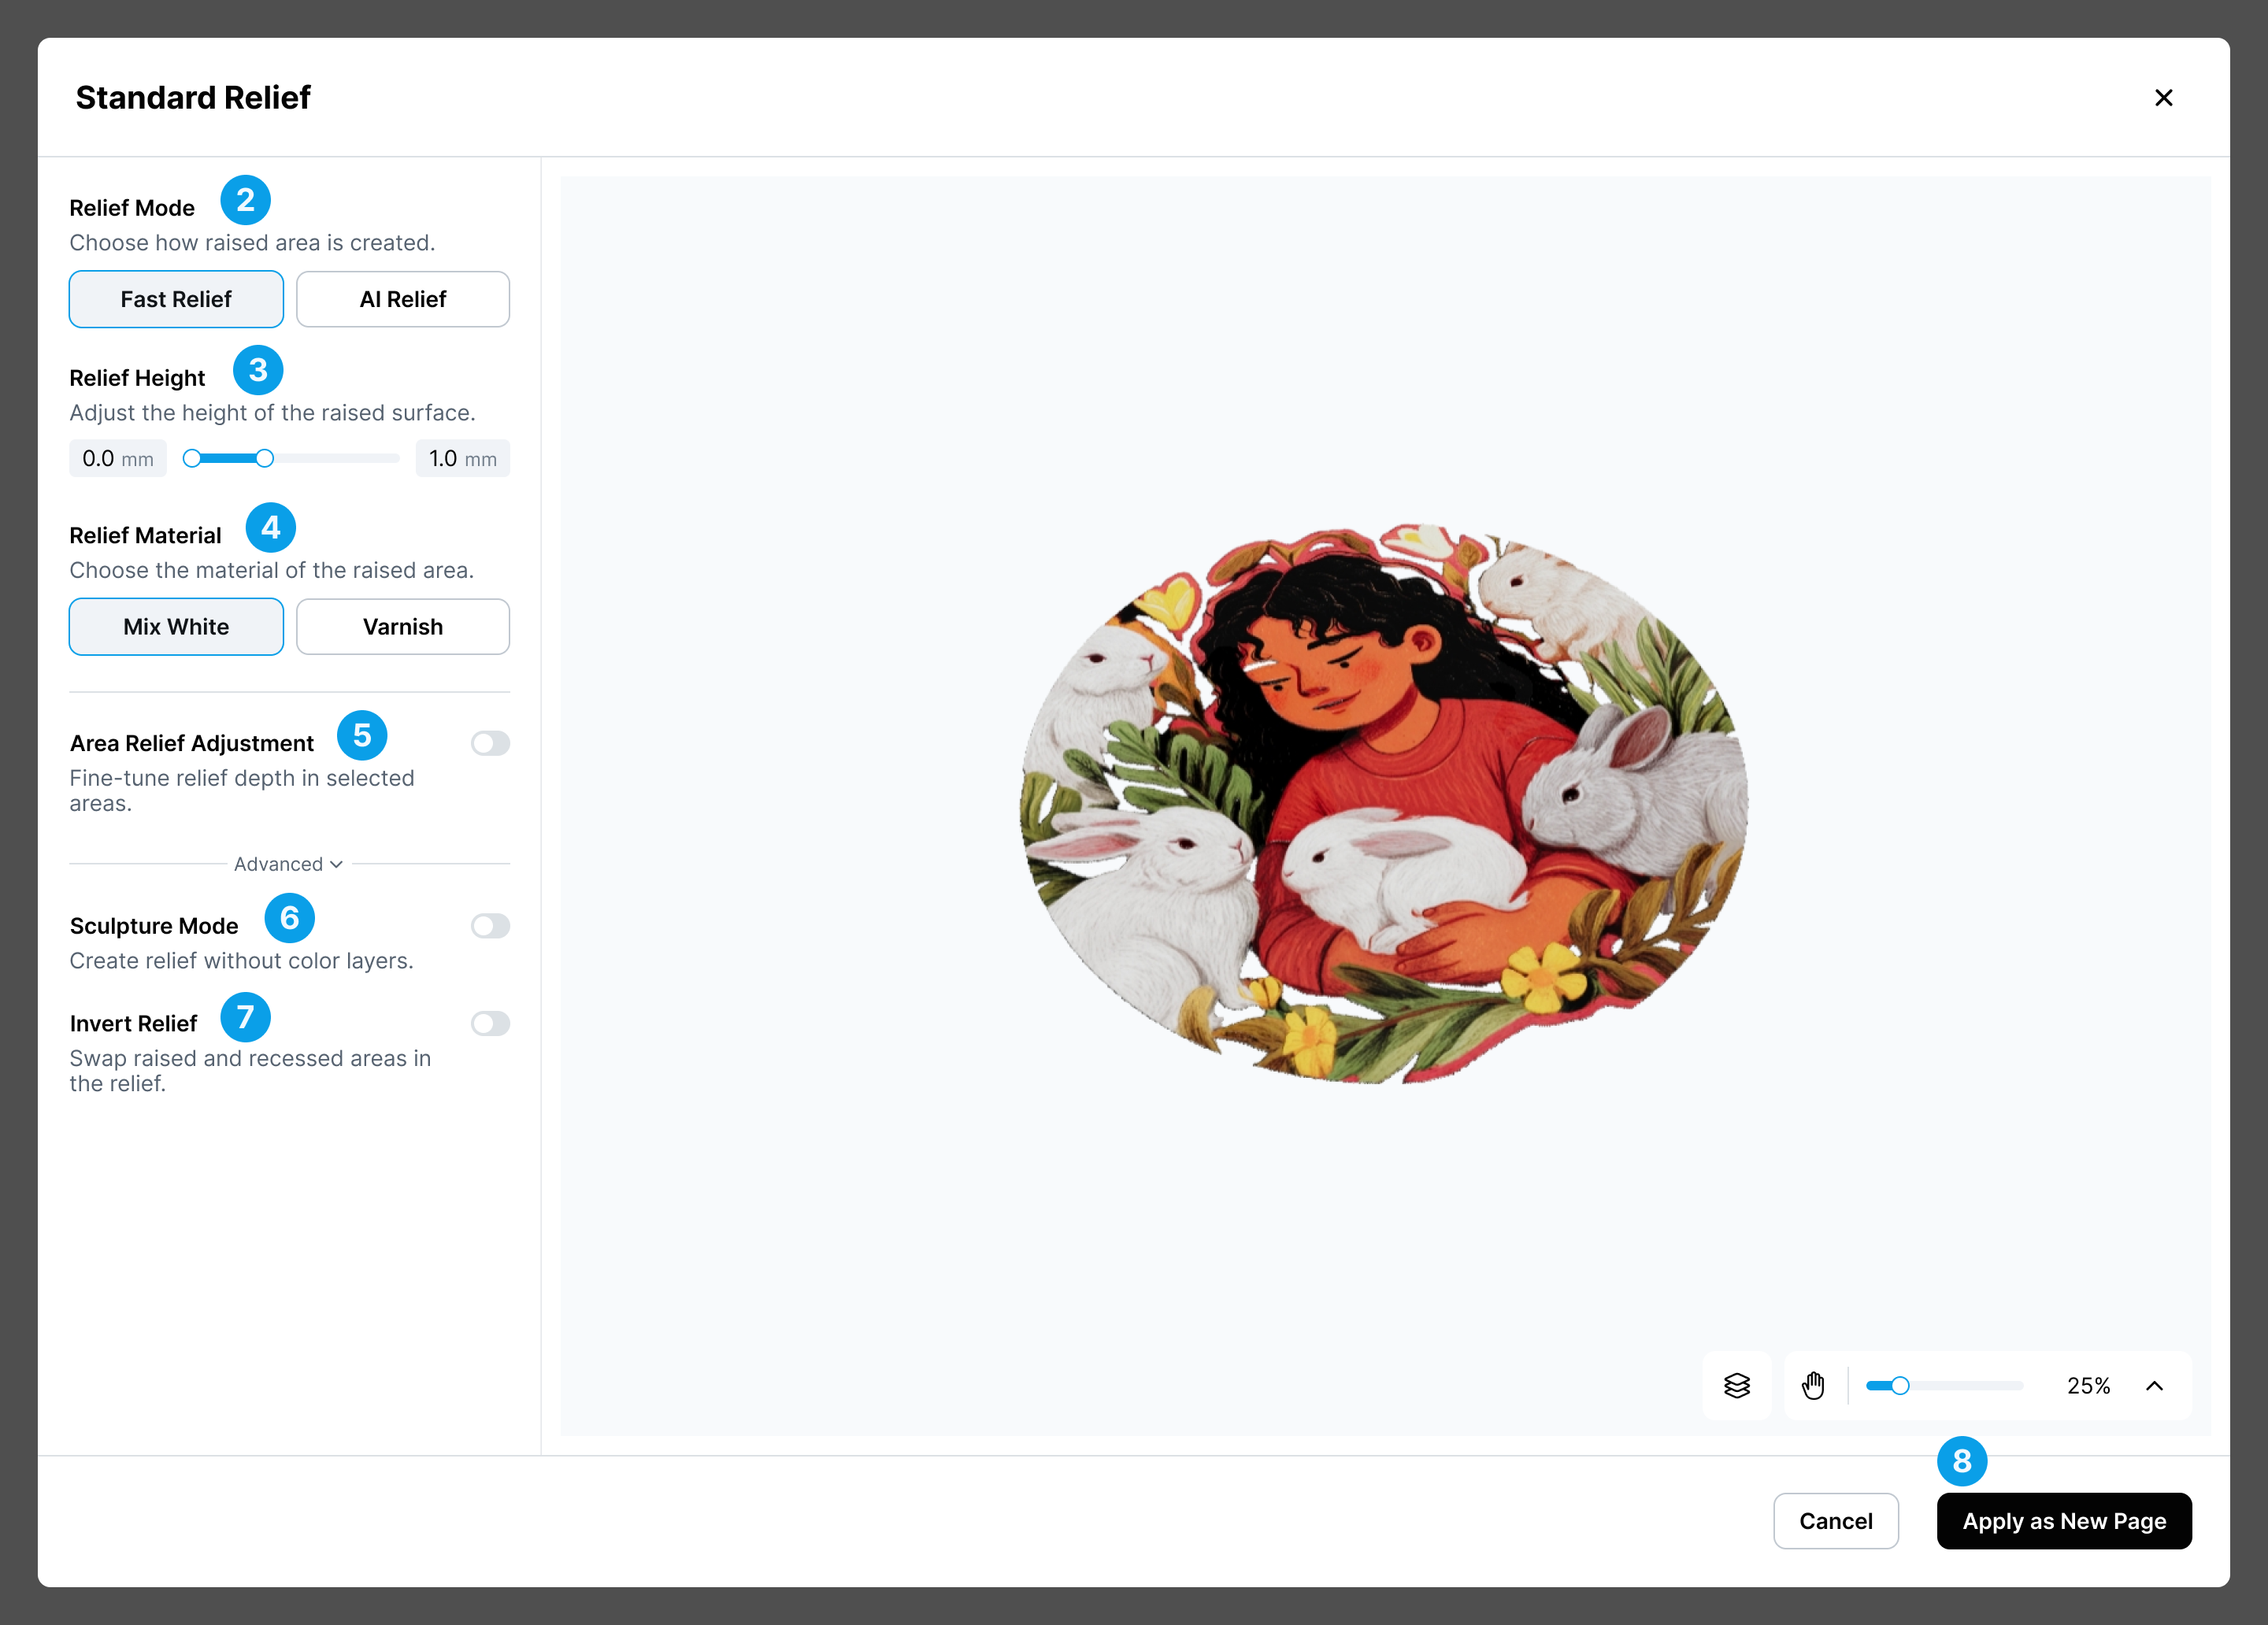
Select **Relief Texture **from Effects panel.
-
Choose a Relief Mode.
-
Adjust the Relief Height.
-
Choose the Relief Material.
-
Optionally turn on Area Relief Adjustment to fine-tune selected areas.
-
Optionally adjust the advanced setting of Sculpture Mode to create no color relief.
-
Optionally adjust the advanced setting of Invert Relief to create recessed relief.
-
Preview the result.
-
Click Apply as New Page to create a new page with the effect result.
¶ Relief Mode
| Mode | Description | Best For |
|---|---|---|
| Fast Relief | Quickly creates a raised surface from the image. | Simple images, clear shapes, fast preview. |
| AI Relief | Generates a more detailed and natural relief result. | Photos, complex images, detailed artwork. |
¶ Relief Height
Relief Height controls how high the raised surface will be printed.
A lower value creates a subtle texture.
A higher value creates a stronger, more visible raised effect.
The available height range may vary depending on the selected effect, material, and printer settings.
¶ Relief Material
| Material | Description |
|---|---|
| Mix White | Builds raised areas using a mixed white-based material effect. It is useful when the relief needs stronger structure. |
| Varnish | Add a transparent raised or glossy coating. It is useful for clear, shiny surface effects. |
¶ Area Relief Adjustment
Turn on Area Relief Adjustment when you want to adjust only part of the design.
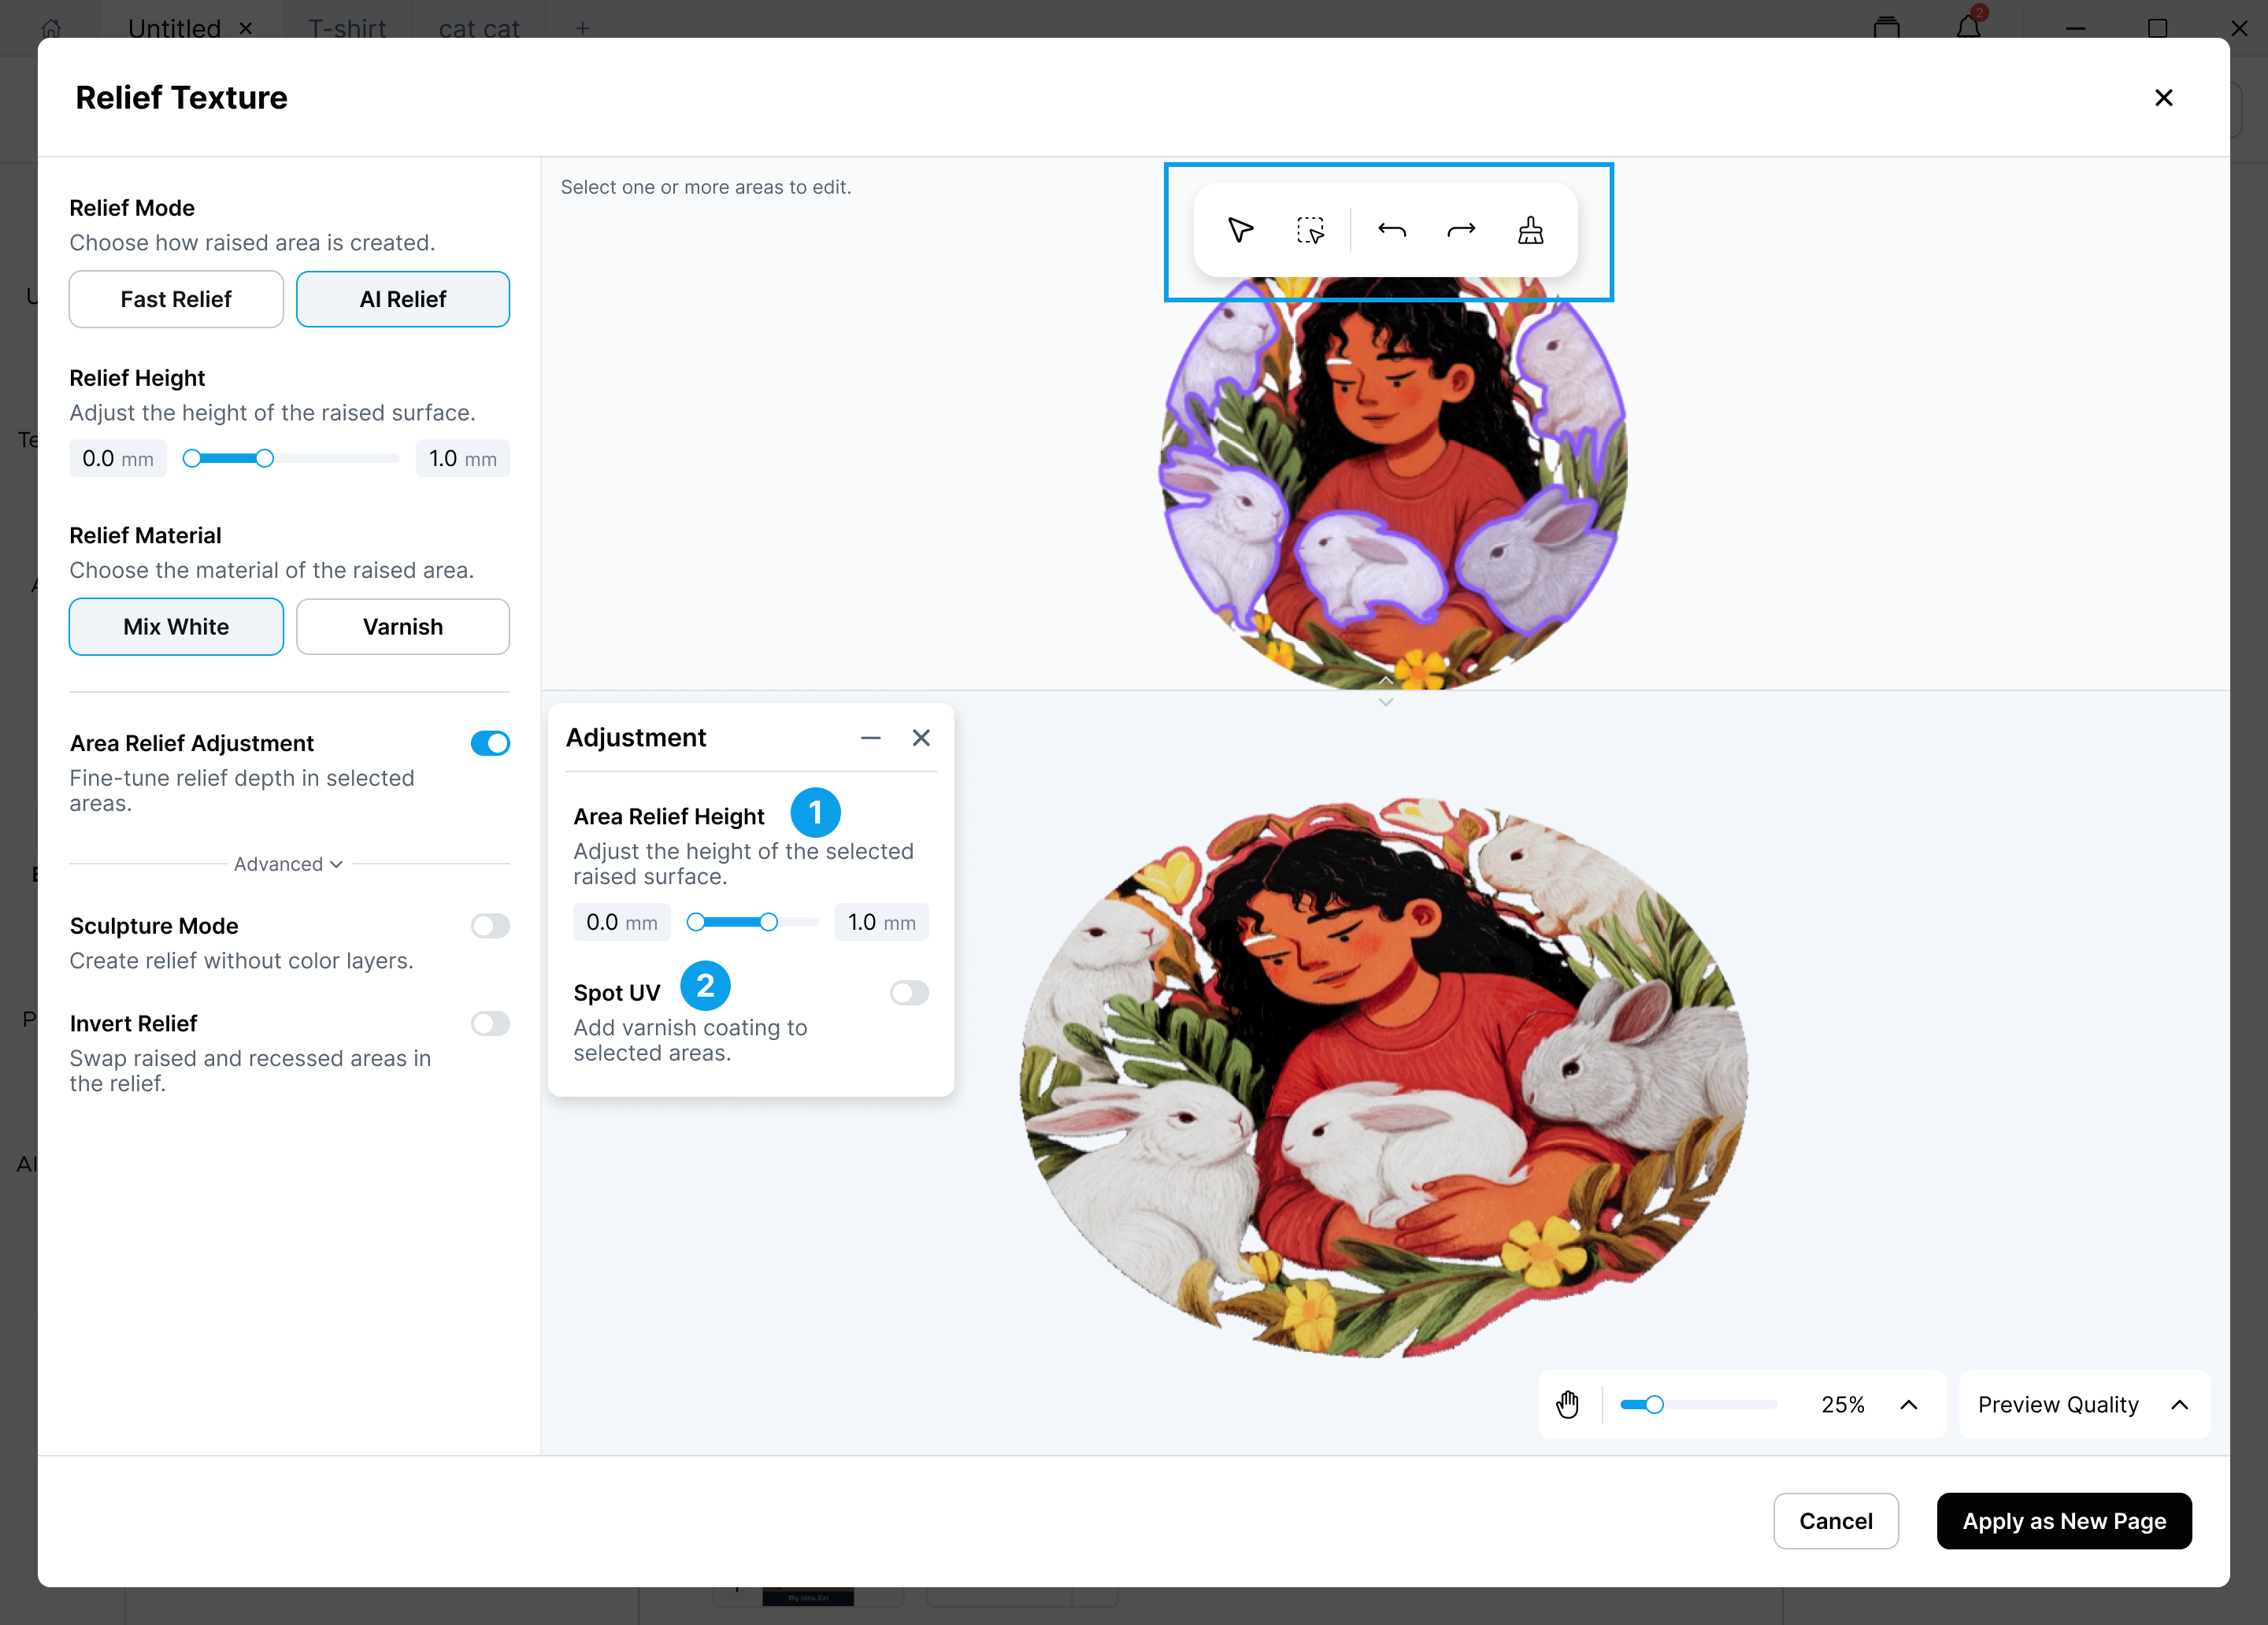
When this option is enabled, you can select one or more areas in the preview and edit them separately.
The Adjustment panel includes:
| Control | Description |
|---|---|
| 1. Area Relief Height | Adjust the height of the selected area only. |
| 2. Spot UV | Add varnish coating to selected areas. |
Use this when only specific parts of the design should be higher, lower, or glossy.
¶ Advanced Options
| Option | Description |
|---|---|
| Sculpture Mode | Creates relief without color layers. Use this when the result should focus on shape and surface instead of printed color. |
| Invert Relief | Swaps raised and recessed areas. Areas that were high become low, and areas that were low become high. |
These options are advanced. For most users, the default settings are recommended.
¶ Material Texture
Material Texture adds realistic textures to your design, such as fabric, asphalt, brick, stone, leather, etc. You can also add custom textures.
¶ Material Texture Workflow
-
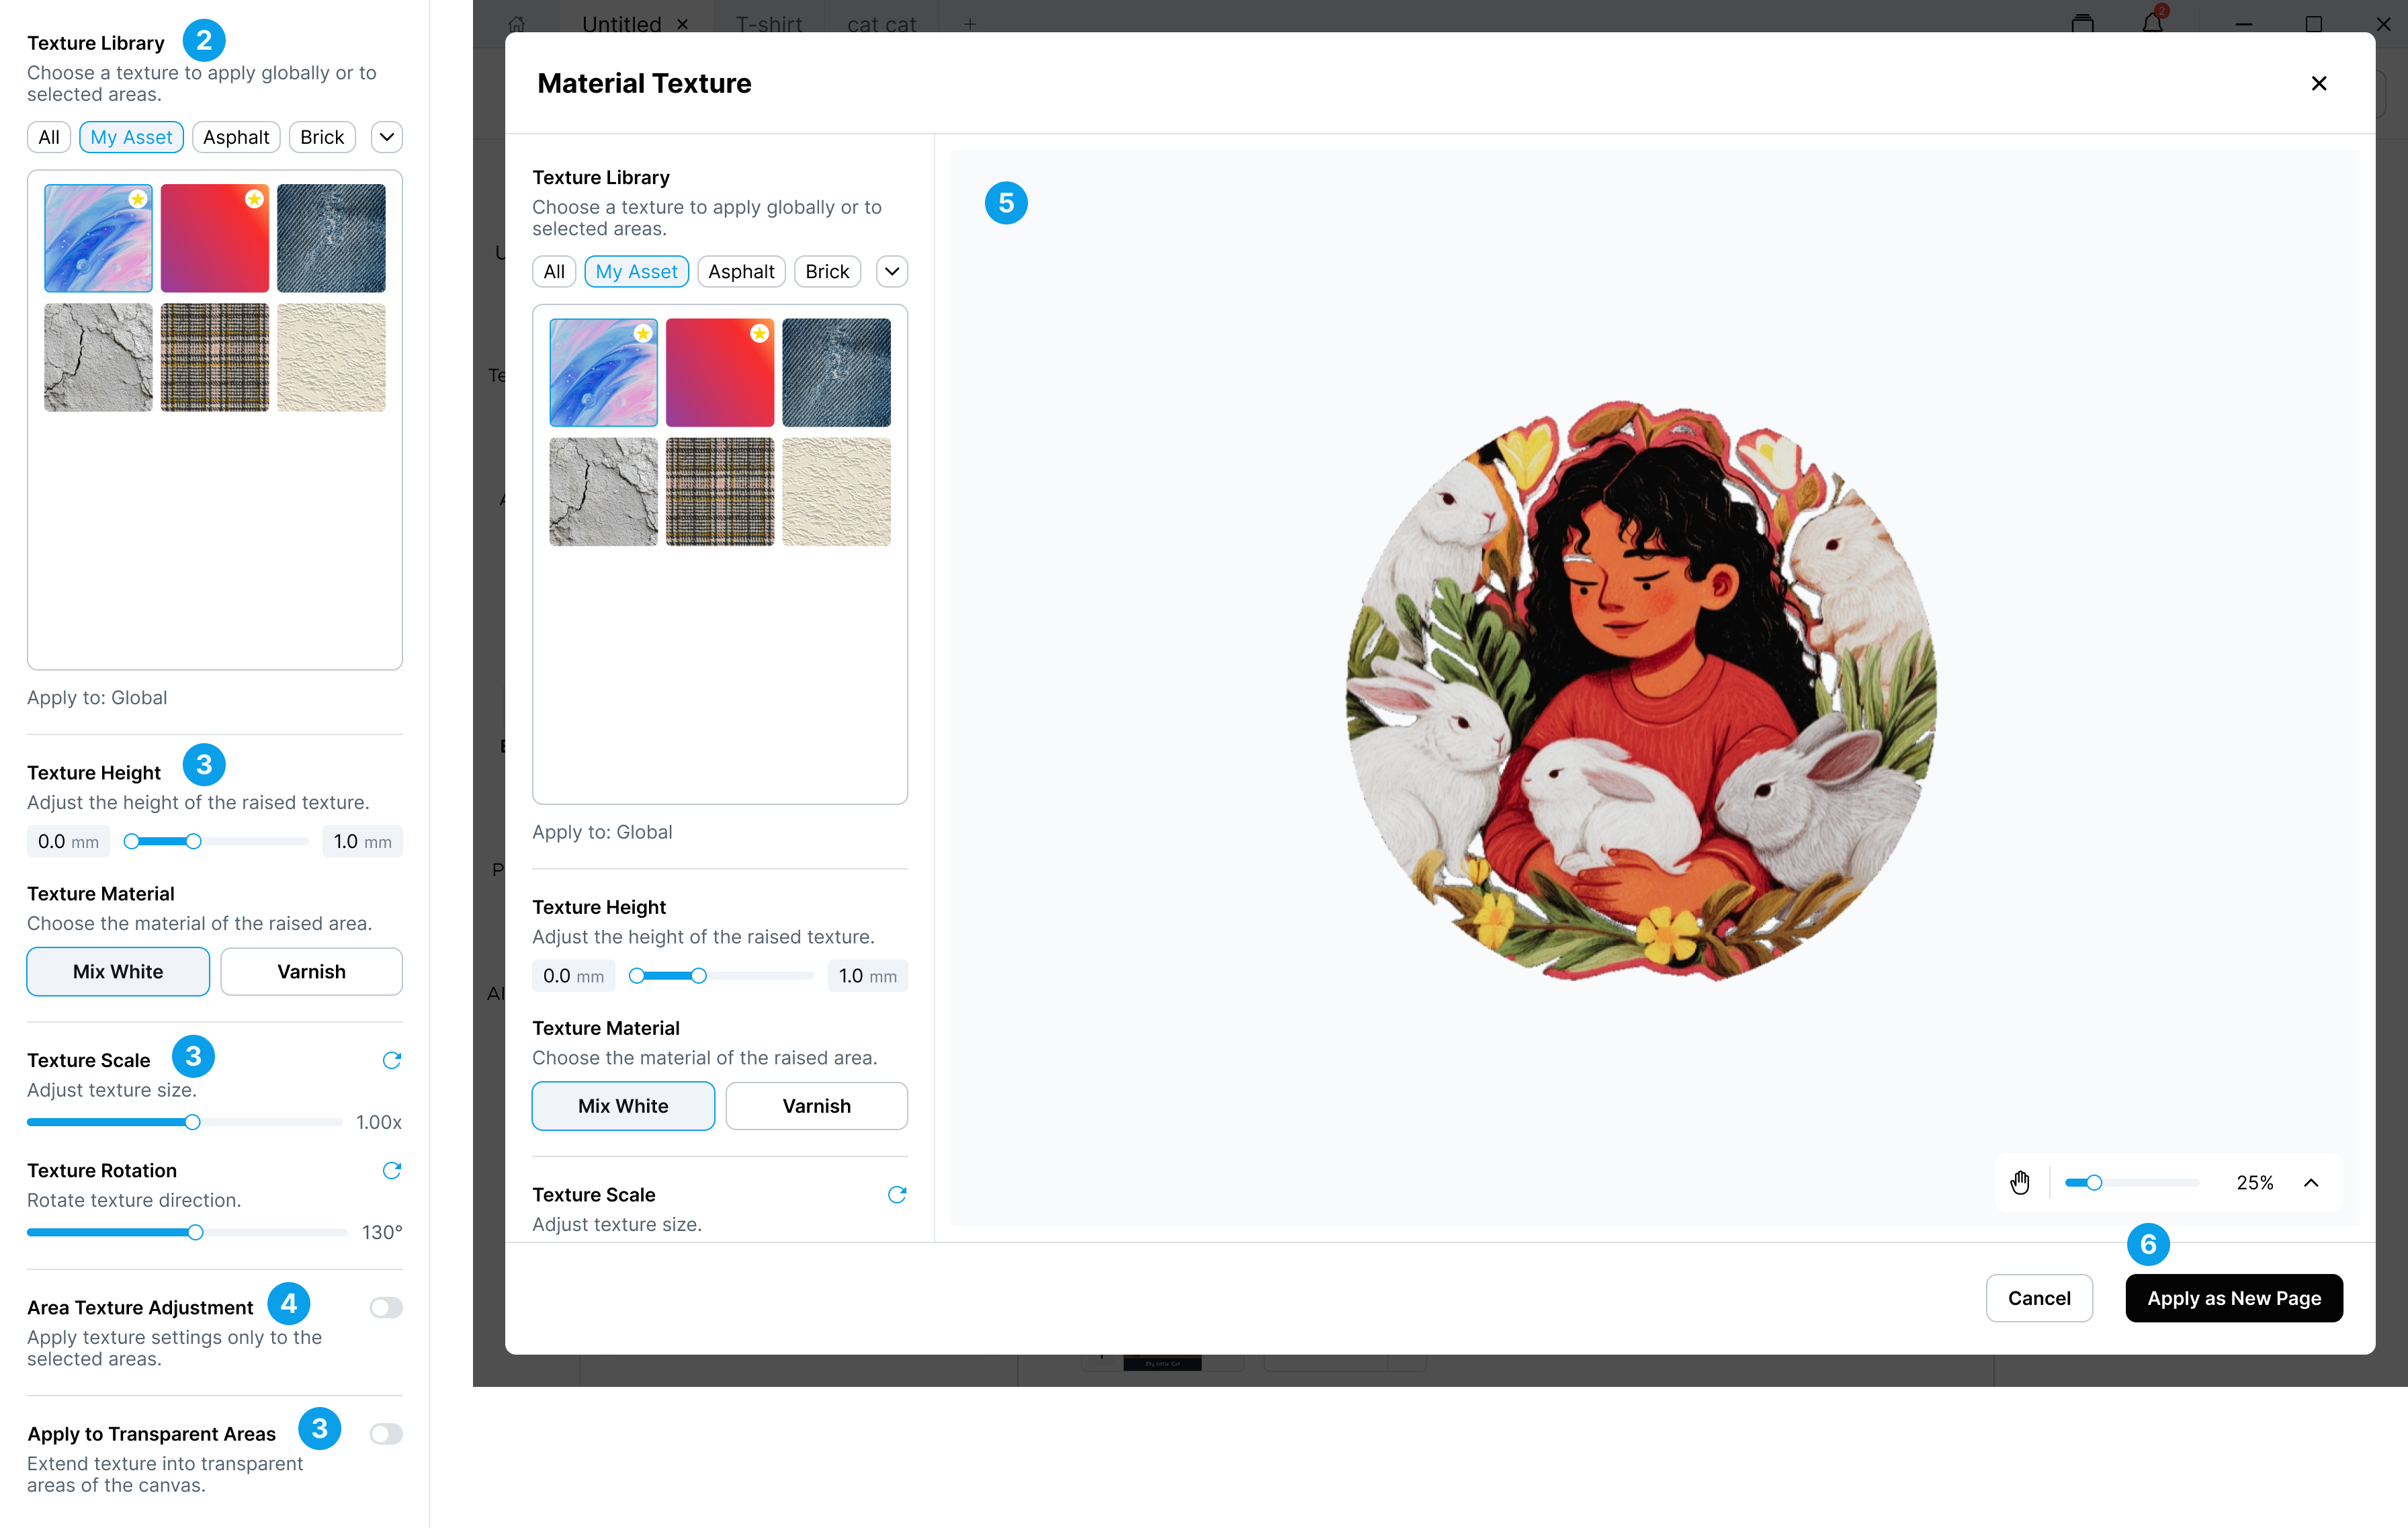
Select **Material Texture **from Effects from the left toolbar.
-
Choose a texture from the Texture Library.
-
Adjust the texture settings if needed.
-
Optionally turn on Area Texture Adjustment to apply texture only to selected areas.
-
Preview the result.
-
Click Apply as New Page to create a new page with the texture result.
¶ Texture Library
The Texture Library lets you choose which texture to apply.
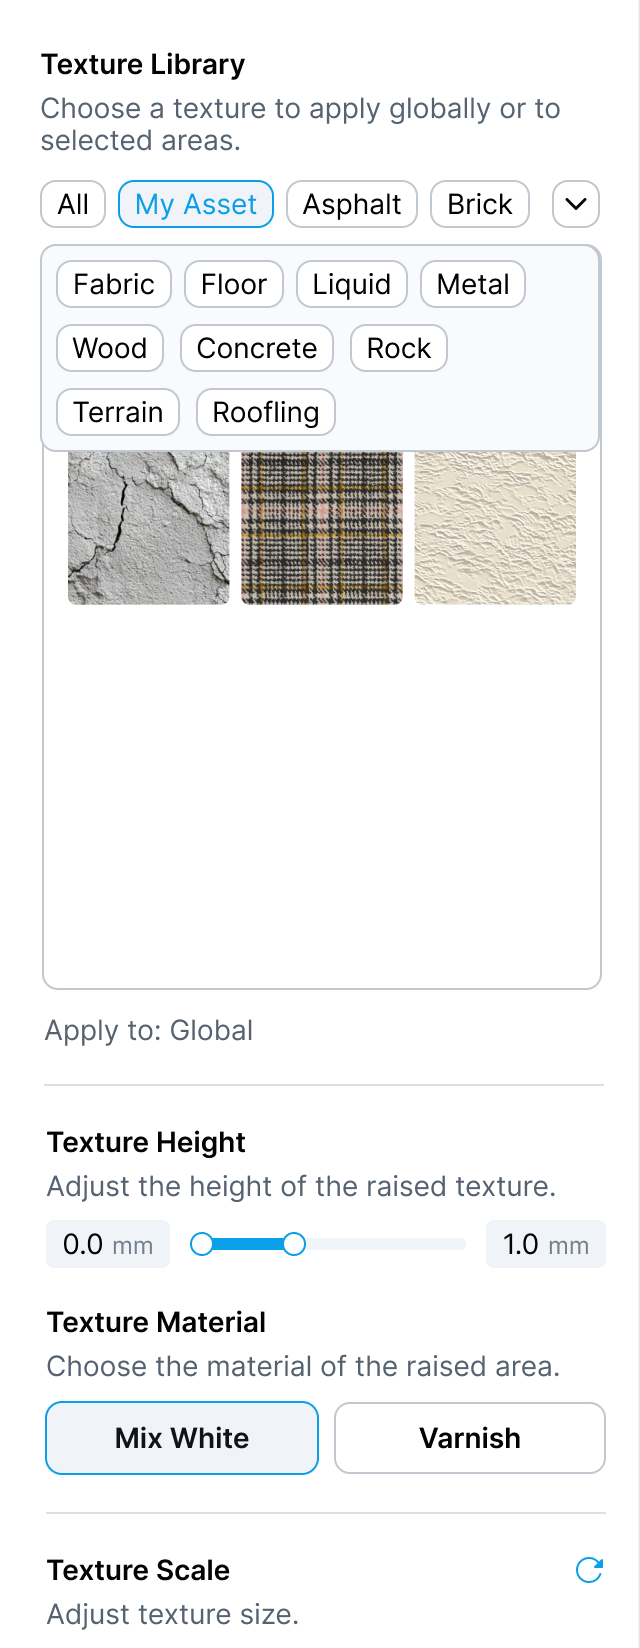
You can browse textures by category, such as All, My Asset, Asphalt, Brick, or other material groups.
By default, the selected texture is applied to the full design. When Area Texture Adjustment is enabled, the texture can be applied to selected areas only.
¶ Texture Settings
After selecting a texture, you can adjust how the texture appears and prints.
| Setting | Description |
|---|---|
| Texture Height | Control how high the raised texture will be printed. |
| Texture Material | Choose the material used for the raised texture. Mix White creates a more solid raised surface. Varnish creates a clear or glossy raised texture. |
| Texture Scale | Adjusts the size of the texture pattern. |
| Texture Rotation | Rotates the direction of the texture pattern. |
| Apply to Transparent Areas | Extends the texture into transparent areas of the canvas. Use it when the texture should cover the full canvas shape. Keep it off when the texture should only follow the visible image area. |
¶ Area Texture Adjustment
Turn on Area Texture Adjustment when you want to apply or adjust texture only on part of the design.
When this option is enabled, select one or more areas in the preview, then adjust the local texture settings.
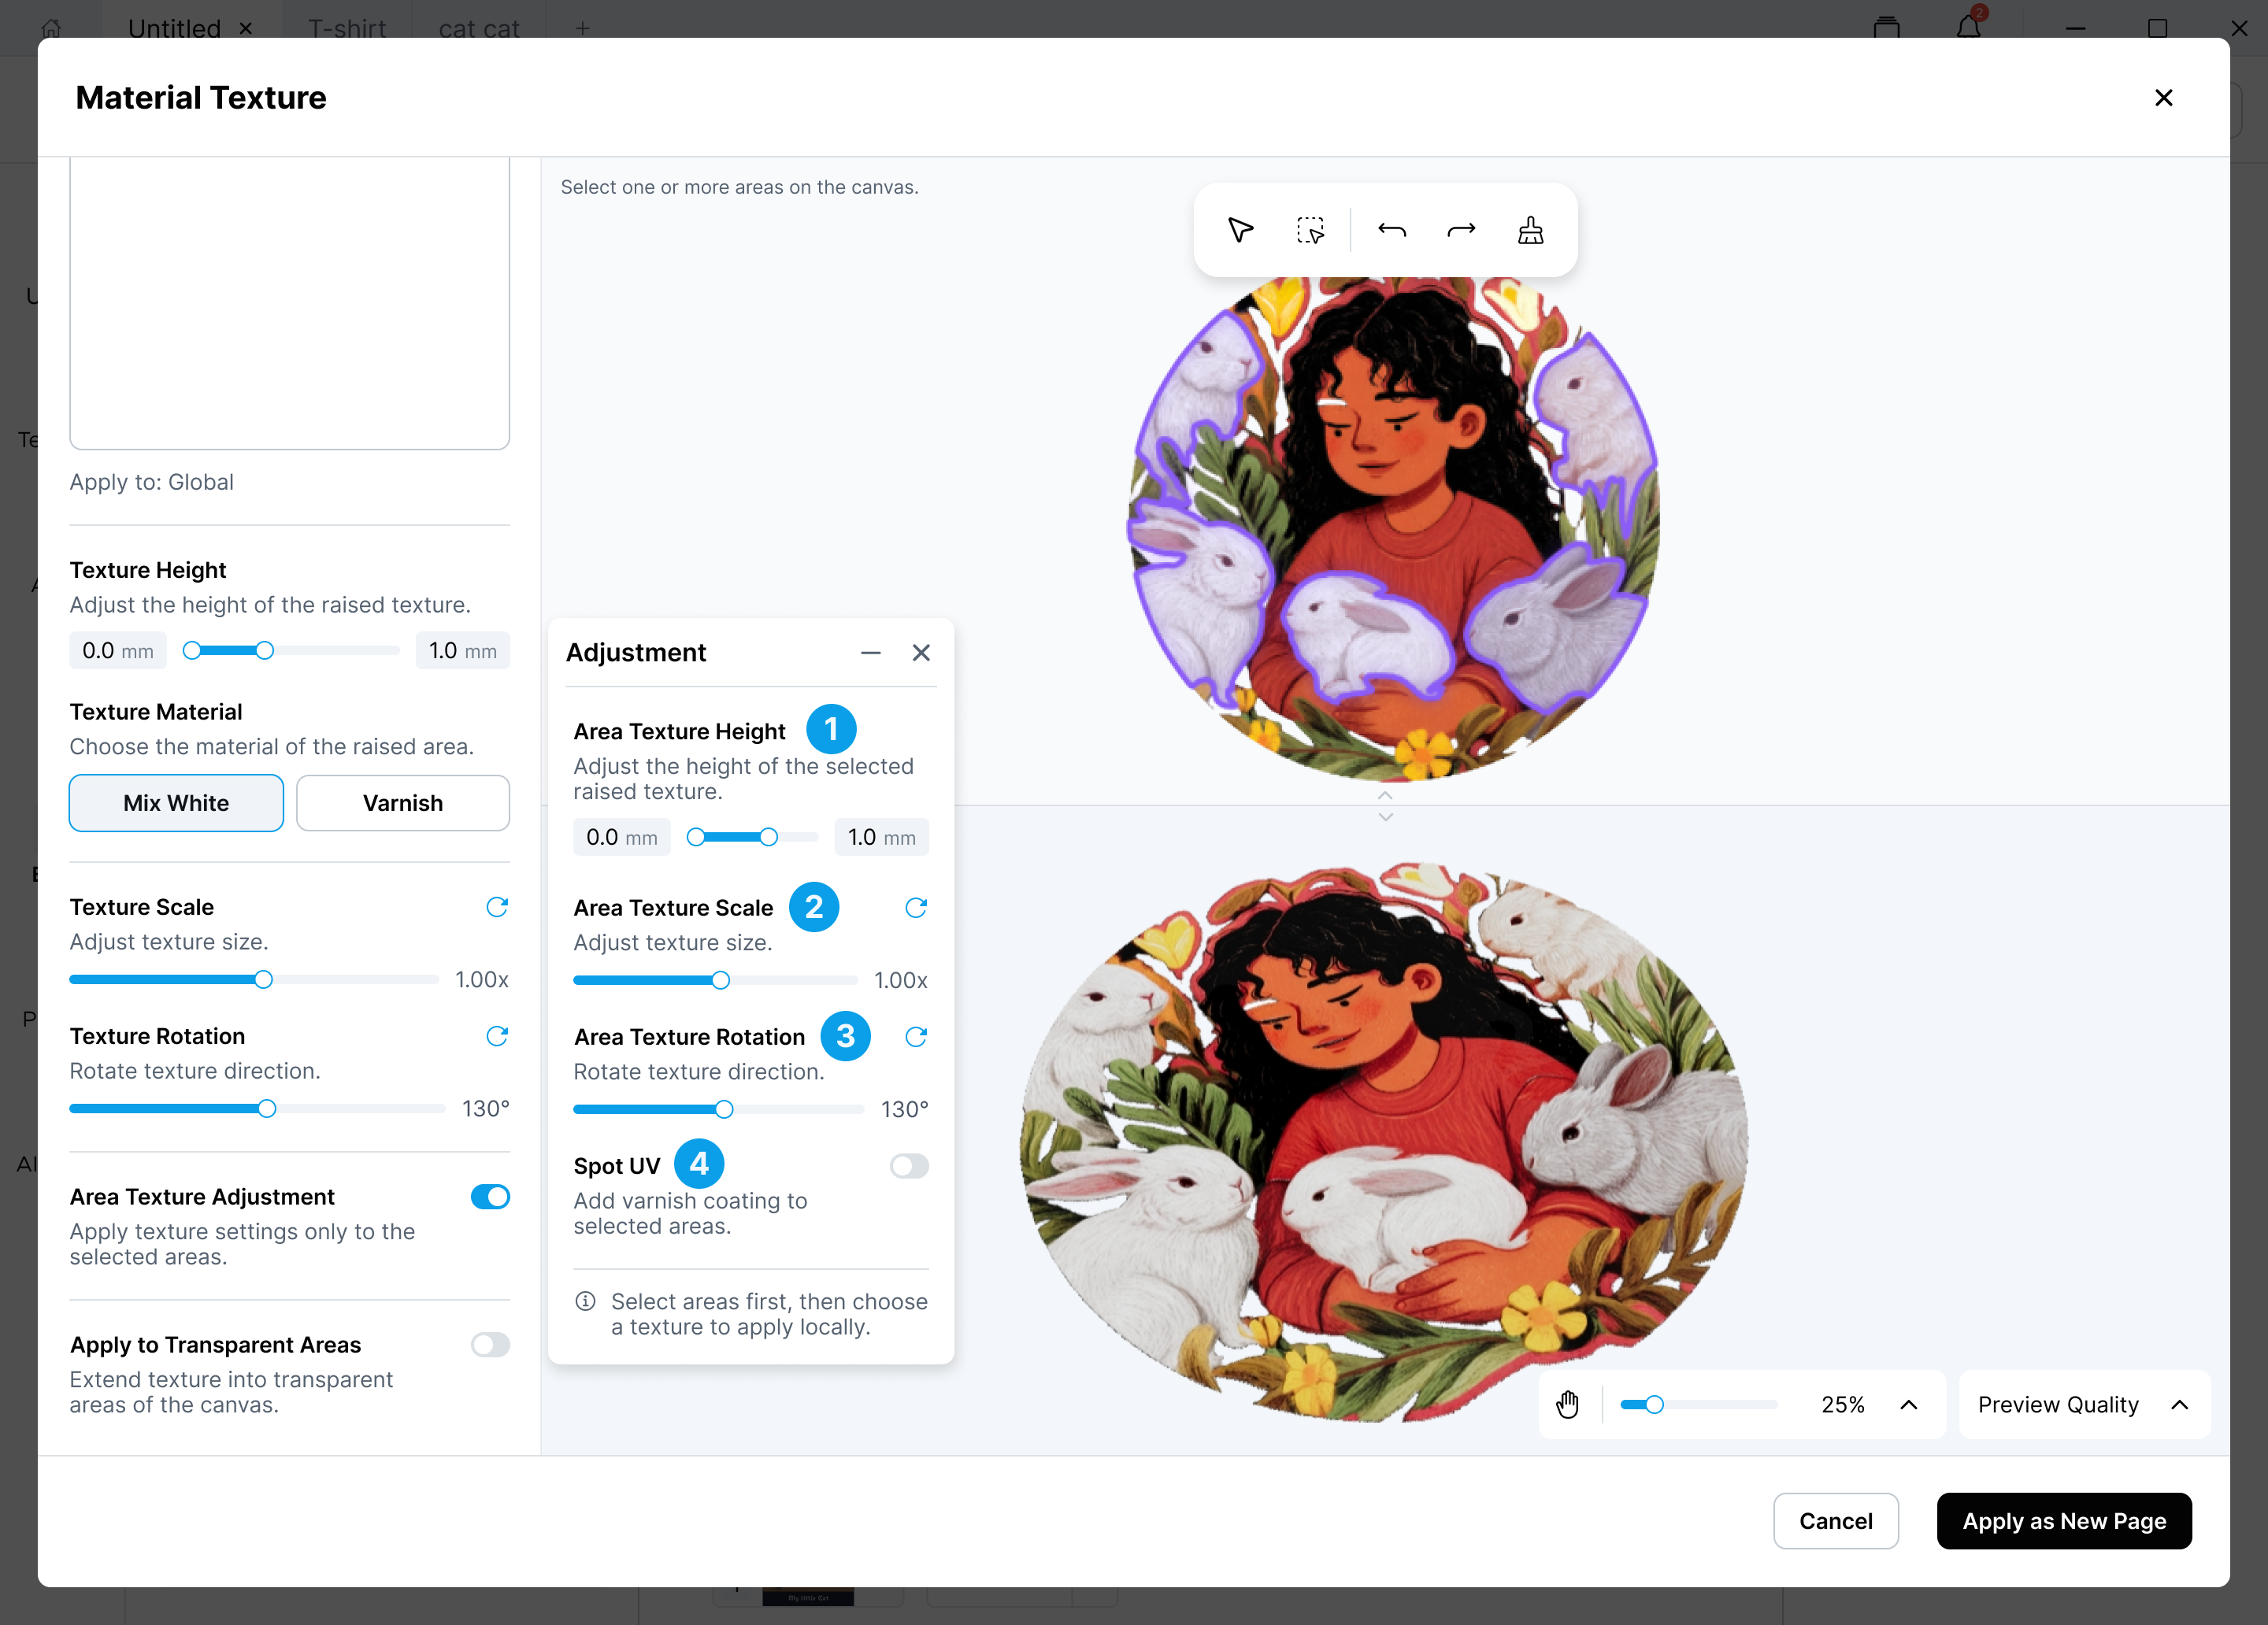
The Adjustment panel may include:
| Control | Description |
|---|---|
| 1. Area Texture Height | Adjust the texture height of the selected area only. |
| 2. Area Texture Scale | Adjust the texture size of the selected area only. |
| 3. Area Texture Rotation | Rotate the texture direction of the selected area only. |
| 4. Spot UV | Add varnish coating to selected areas. |
Use this when different parts of the design need different texture effects.
¶ Applying a Material Texture Result
After previewing the result, click Apply as New Page.
This creates a new page with the material texture result, while keeping your original design page unchanged.
¶ Style Transfer Overview
Style Transfer effects turn your current image into a craft-style visual result, then help you create printable relief based on that result.
The available Style Transfer effects are:
-
Oil Painting
-
Stained Glass
-
Holo Engraving
-
Embroidery
-
Mosaic
¶ Style Transfer Workflow
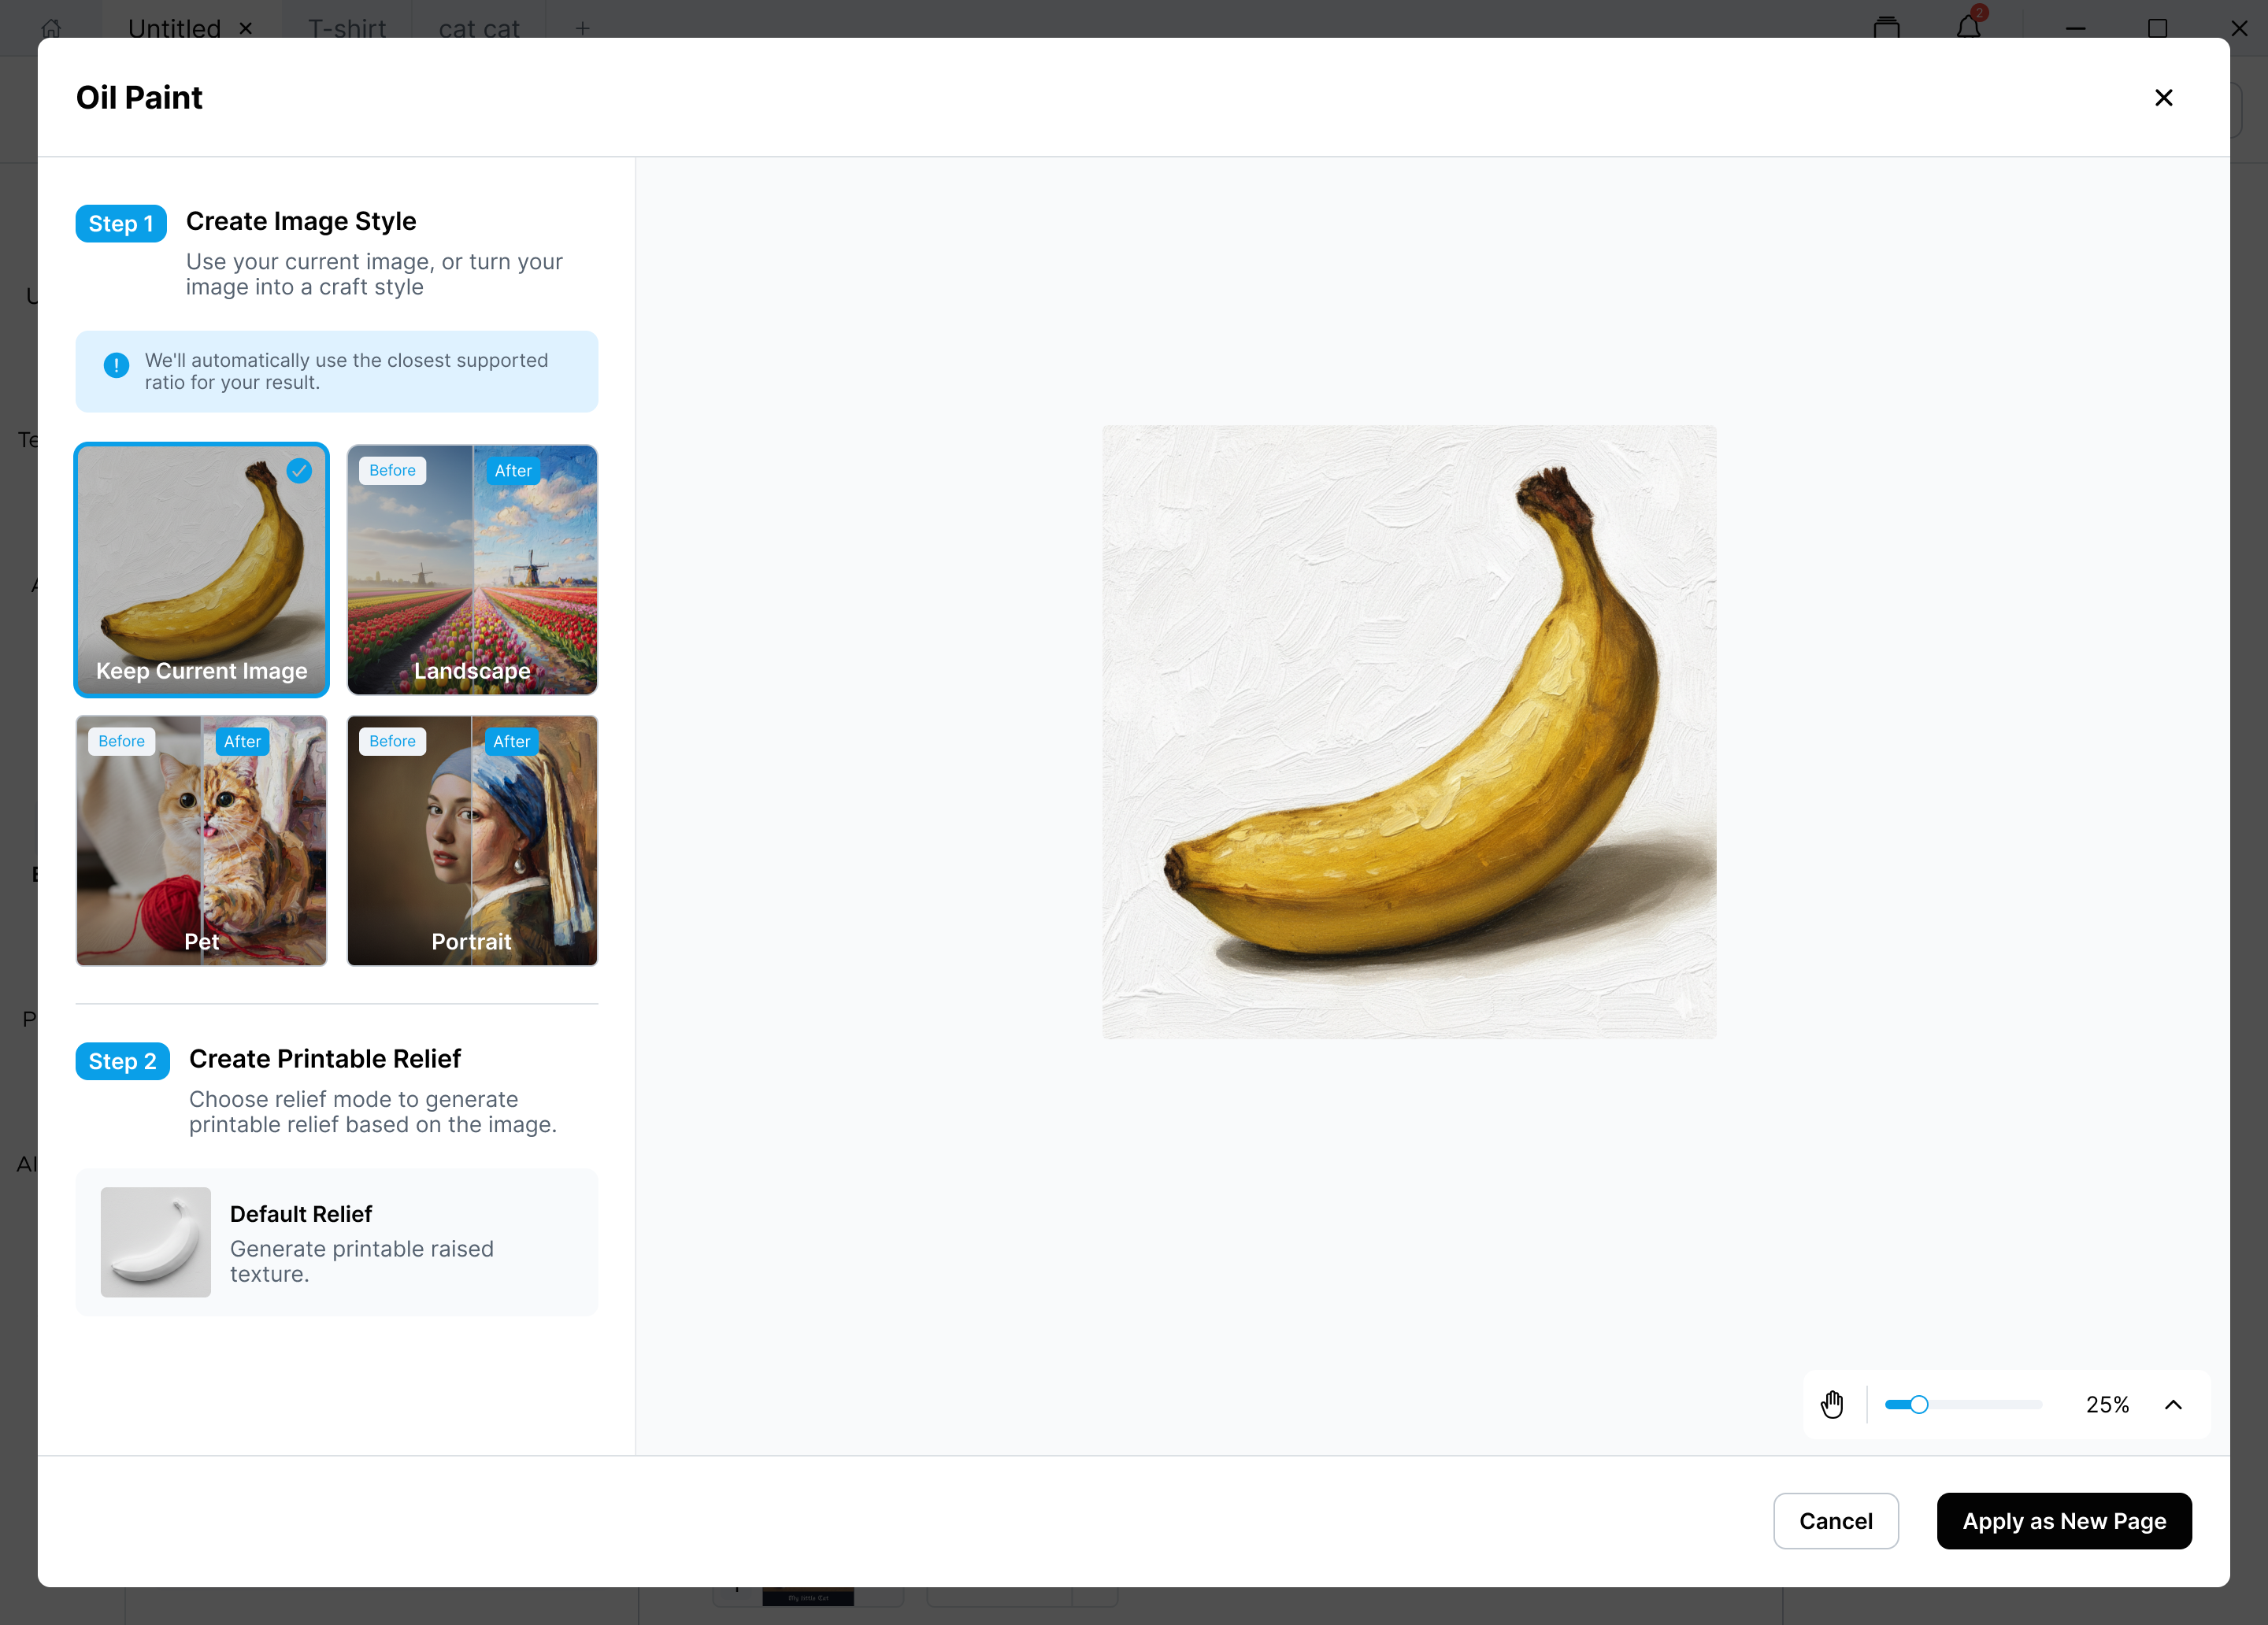
Most Style Transfer effects use the same two-step flow.
¶ Step 1: Create Image Style
Choose how the image should look.
Depending on the selected effect, you can either keep the current image or generate a new craft-style image.
The app automatically uses the closest supported ratio for generation.
Supported generation ratios include:
-
1:1
-
3:4
-
4:3
-
16:9
-
9:16
This means the generated image may use the closest available ratio, then fit back into your design area as closely as possible.
¶ Step 2: Create Printable Relief
After creating the image style, you can generate printable raised relief from the styled image.
This step usually includes:
| Control | Description |
|---|---|
| Relief Texture | Generates printable raised texture based on the image. |
| Relief Height | Adjusts the height of the raised surface when available. |
| Preset Information | Shows default height range, preset type, or fixed height information. |
Some presets allow relief height adjustment.
Some presets use a fixed height to keep the intended print result.
¶ Style Transfer Effect Types
Use this table to choose the right Style Transfer effect.
| Effect | What It Does | Best For | Available Style Options |
|---|---|---|---|
| Oil Painting | Turns your image into a textured oil-painting style. | Portraits, pets, landscapes, decorative art prints. | Keep Current Image, Landscape, Pet, Portrait |
| Stained Glass | Turns your image into a stained glass-style artwork with bold color areas and decorative outlines. | Decorative illustrations, colorful graphics, simple compositions. | Keep Current Image, Stained Glass |
| Holo Engraving | Creates a holographic engraving-style result. | Decorative prints, shiny graphic effects, stickers, packaging accents. | Holo Horizontal, Holo Gradient, Holo Hue |
| Embroidery | Turns your image into a stitched, textile-inspired style. | Craft artwork, patch-like designs, cute illustrations, handmade-looking prints. | Keep Current Image, Embroidery |
| Mosaic | Turns your image into a tile-like mosaic artwork. | Geometric decoration, bold color compositio |
¶ Relief Settings by Effect
Each Style Transfer effect may use different relief rules. Check the preset information in the panel before applying the result.
¶ Applying a Style Transfer Result
After previewing the result, click Apply as New Page.
This creates a new page with the effect result, while keeping your original design page unchanged.