¶ 1. Overview
Alignment helps position a design accurately on a physical object so that the printed result matches the intended placement.
Morpho Studio provides three Alignment methods:
- Smart Alignment – Automatically scans objects and generates editable alignment references. Recommended for most printing scenarios.
- Snapshot Alignment – Captures an image of the printbed and allows you to position the design manually using the image.
- Zero-Point Alignment – Displays a coordinate grid instead of a camera image. Use it when visual Alignment is unavailable.
¶ 2. Choose an Alignment Method
Smart Alignment and Snapshot Alignment are recommended for most scenarios. Zero-Point Alignment is intended only as a fallback when Snapshot Alignment is unavailable or cannot be completed.
| Method | Best For | Description |
|---|---|---|
| Smart Alignment | Most printing scenarios | Automatically detects objects and printable areas. |
| Snapshot Alignment | Fast manual positioning | Uses a captured image of the printbed for manual placement. |
| Zero-Point Alignment | Camera unavailable | Uses a coordinate grid for manual positioning. |
Recommendations
- Use Smart Alignment first for most objects.
- Use Snapshot Alignment when you want faster manual positioning or when Smart Alignment cannot identify the object reliably.
- Use Zero-Point Alignment when the camera image or visual positioning system is unavailable.
¶ 3. Smart Alignment
¶ 3.1 Overview
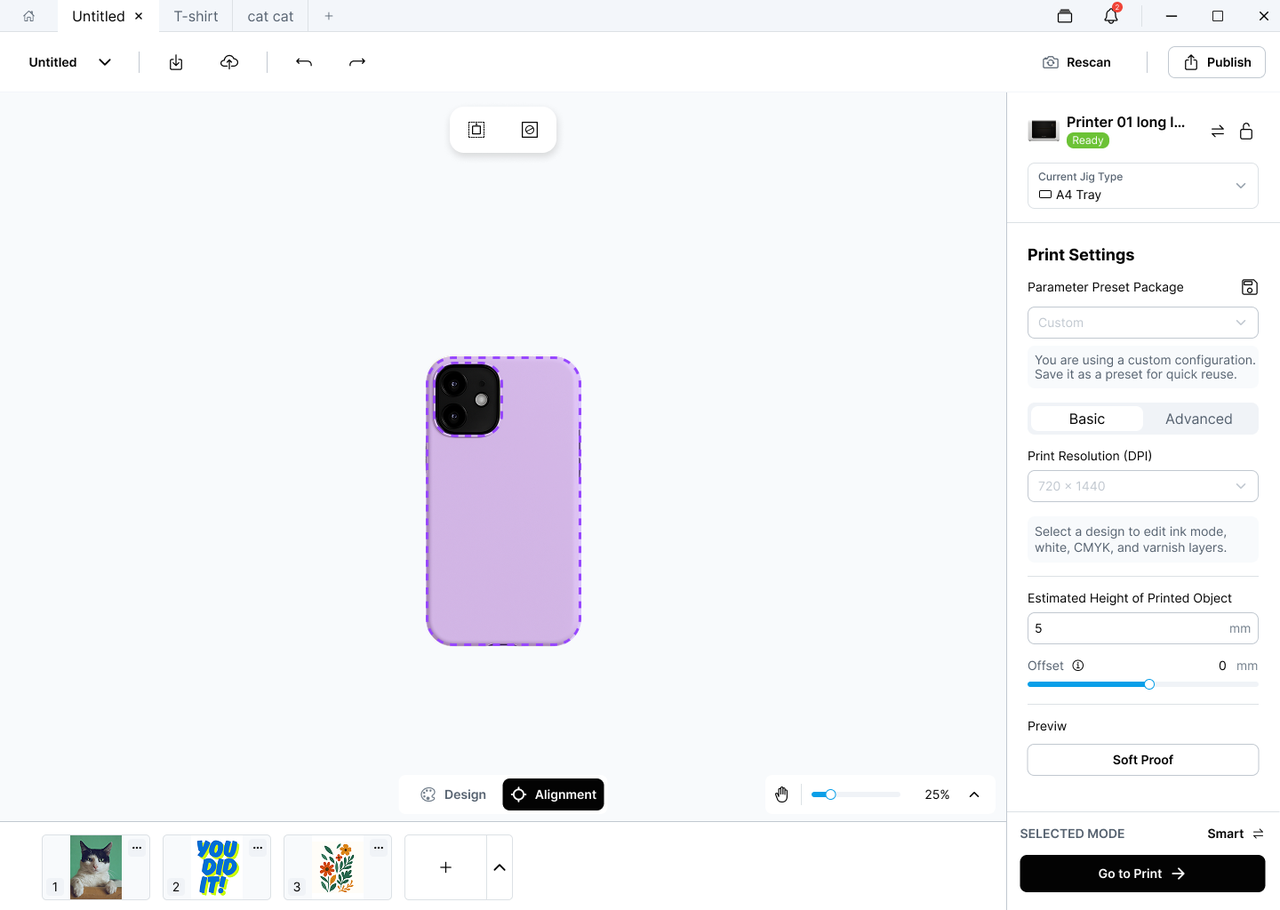
Smart Alignment automatically scans objects placed on the printbed and generates alignment references.
Depending on the object and scan result, it may identify:
- Object outline
- Printable area
- Object position
- Object dimensions
- Object height
After scanning, you can adjust the design before printing.
¶ 3.2 How to Use
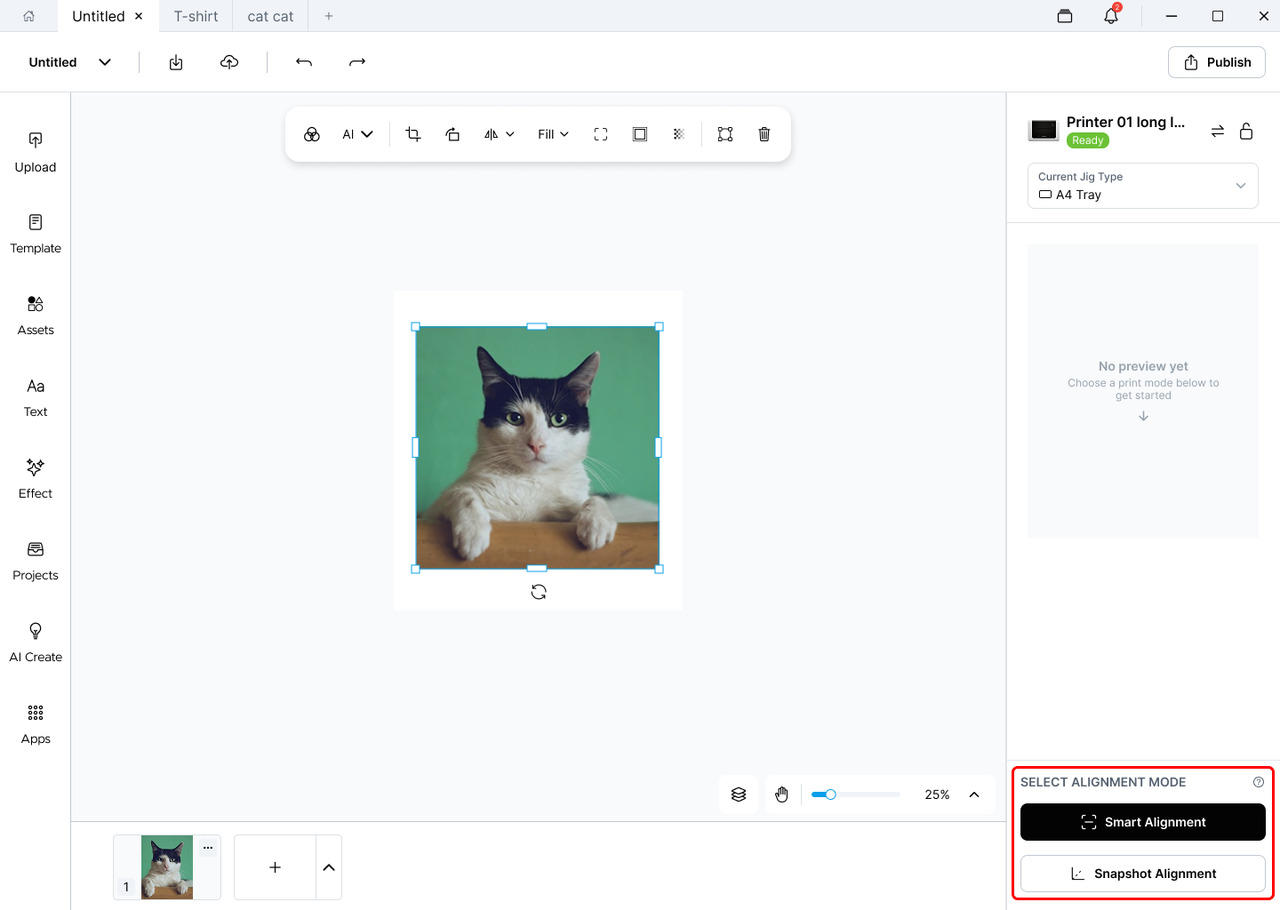 |
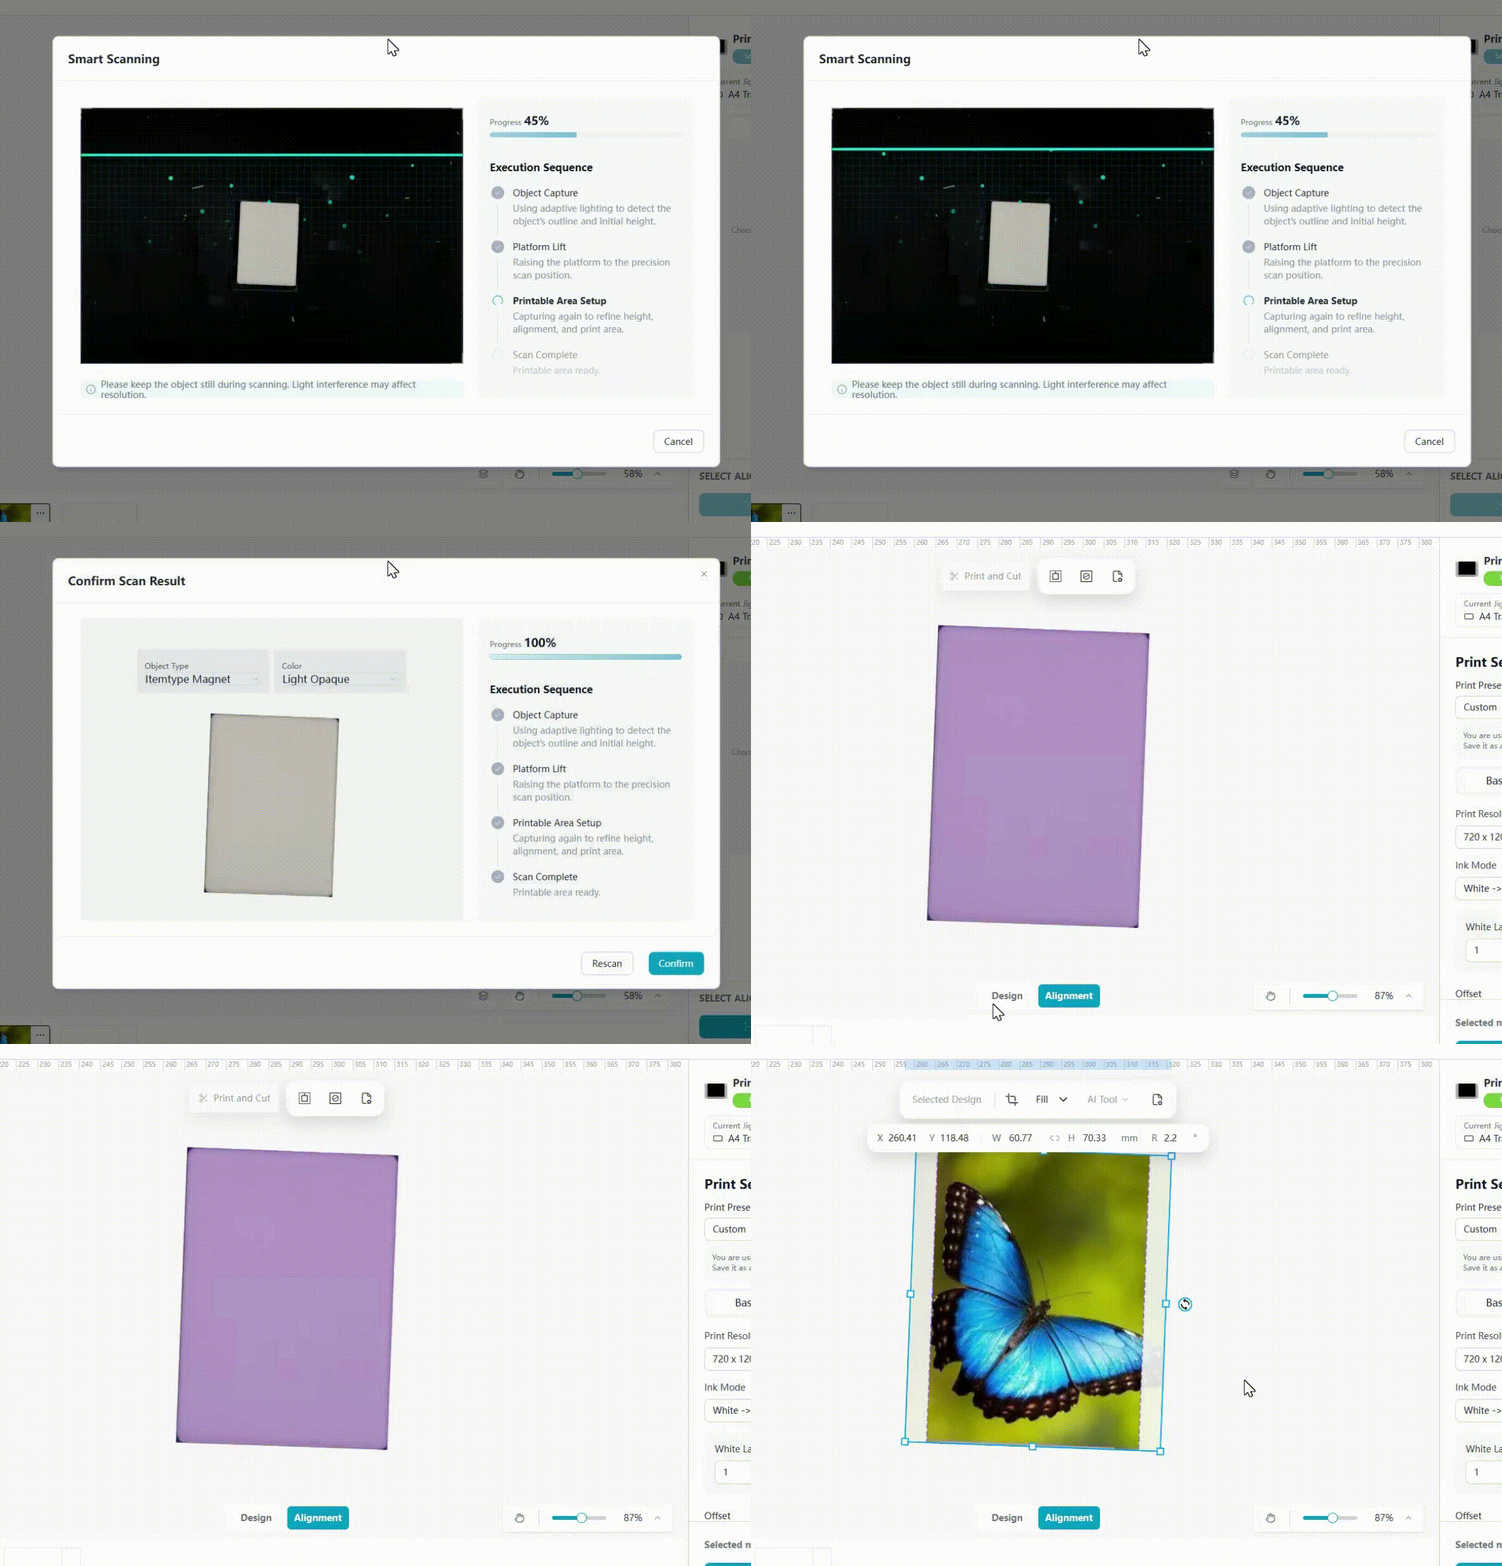 |
- Place the objects on the printbed.
- Open Alignment.
- Select Smart Alignment.
- Wait for the printer to complete the scan.
- Check the detected objects and printable areas.
- Adjust the design position, size, and rotation as needed.
- Continue to Print Settings.
¶ 3.3 Margin
Margin controls the safe distance between the design and the edge of the printable area.
Increasing the Margin can reduce the risk of printing beyond the object edge, especially on curved or irregular objects.
Note
Margin is available only in Smart Alignment.
¶ 3.4 Recommended Scenarios
Use Smart Alignment for:
- First-time printing
- Irregularly shaped objects
- Multiple objects
- Prints that require accurate positioning
- Workflows where you want to reduce manual adjustments
¶ 3.5 Important Notes
- Do not move objects while scanning is in progress.
- Keep the camera view clear.
- Transparent, reflective, or glossy materials may affect detection.
- If a reliable result cannot be generated, continue with Snapshot Alignment.
¶ 4. Snapshot Alignment
¶ 4.1 Overview
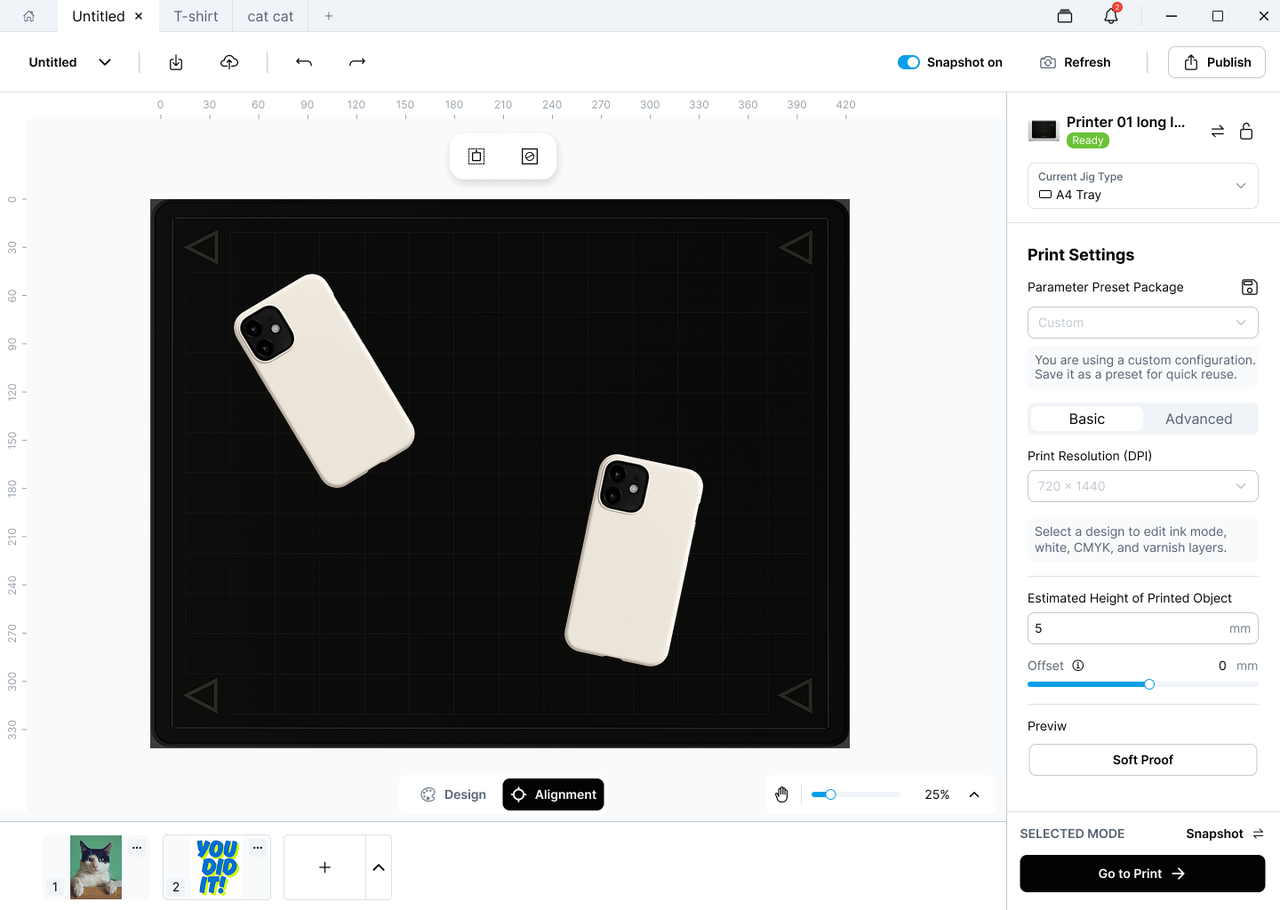
Snapshot Alignment captures a top-down image of the printbed and displays it in the workspace.
The system does not automatically detect object outlines or printable areas. Position, resize, and rotate the design manually using the image as a reference.
¶ 4.2 How to Use
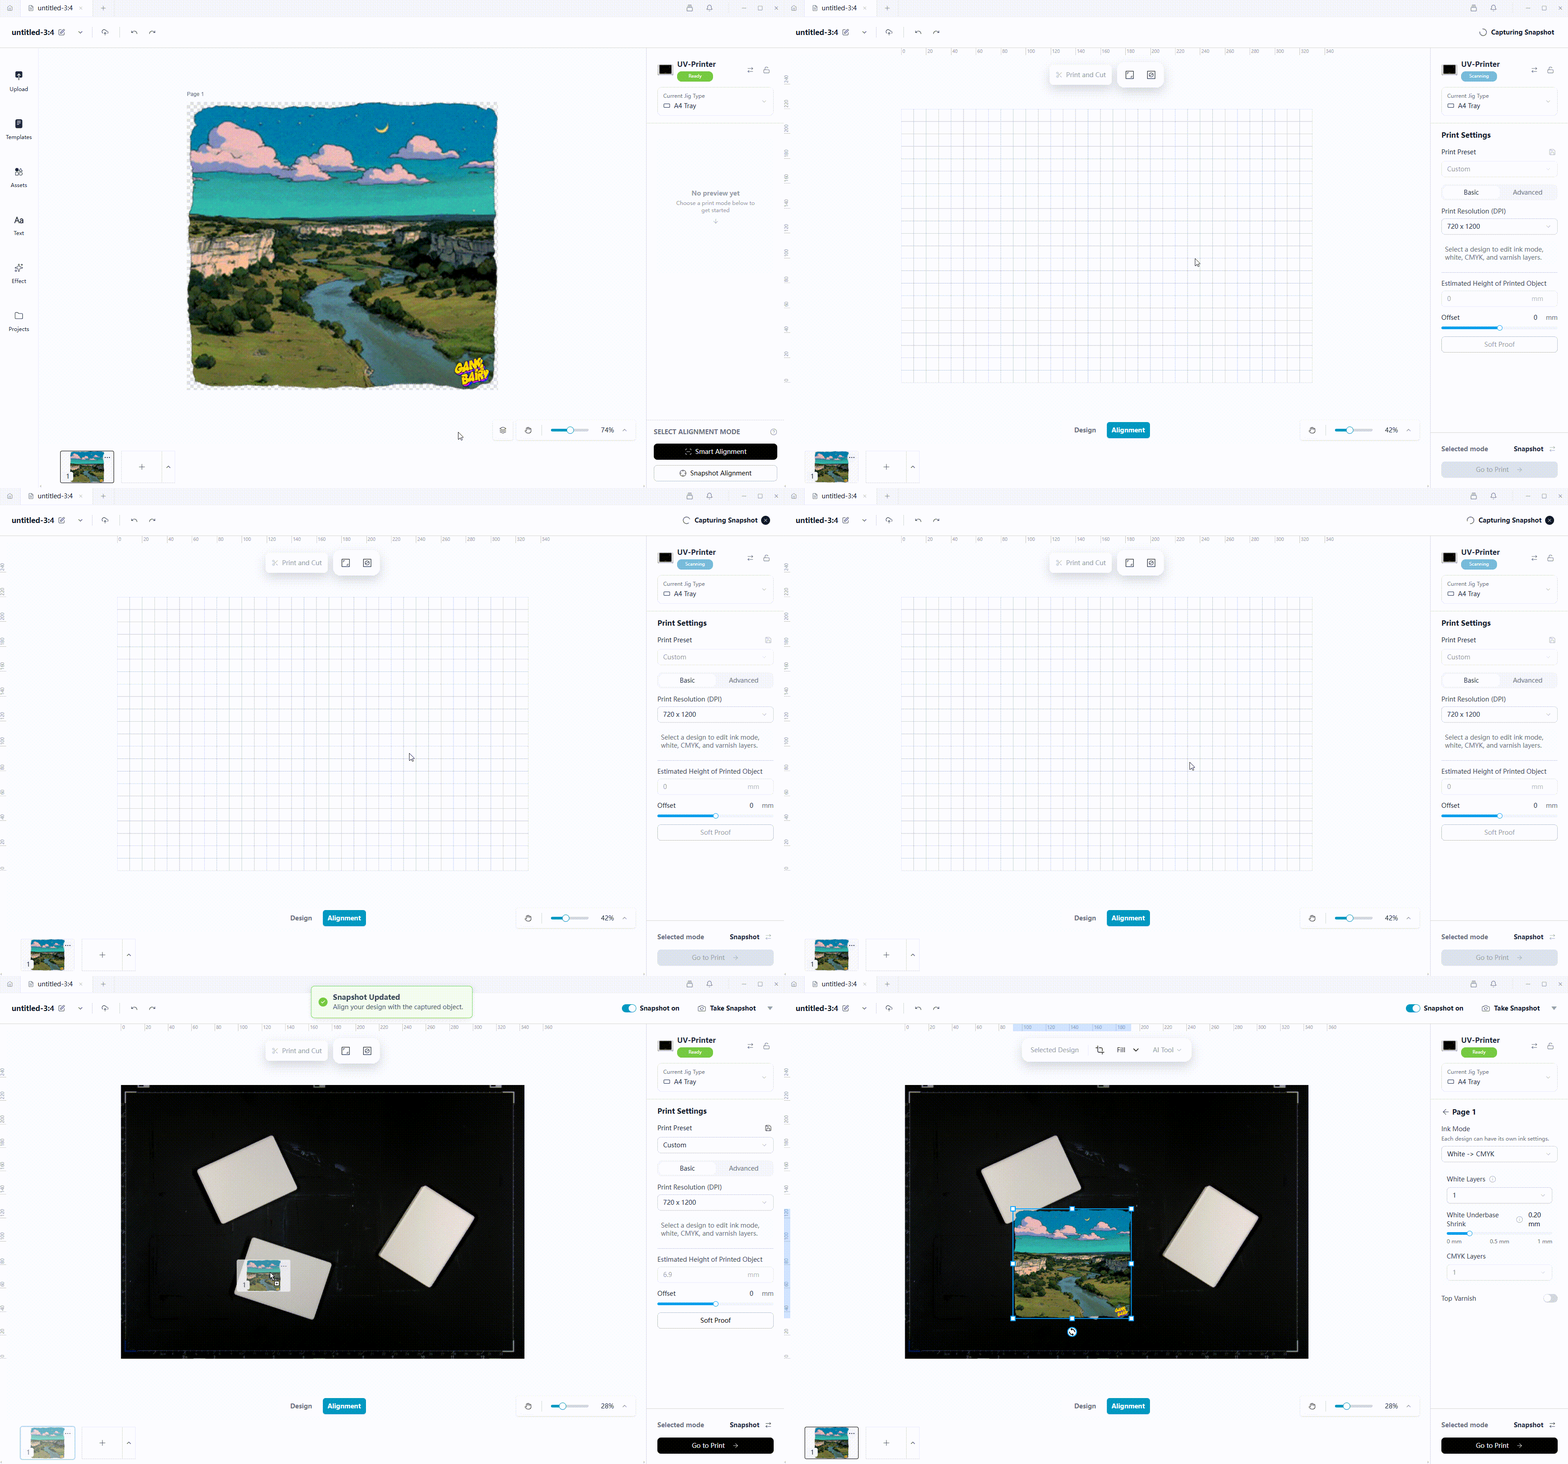
- Place the objects on the printbed.
- Open Alignment.
- Select Snapshot Alignment.
- Wait for the printer to capture the Snapshot.
- Position the design over the object shown in the image.
- Check the design size and rotation.
- Continue to Print Settings.
¶ 4.3 Retake
Select Retake when:
- An object has been moved.
- The object arrangement has changed.
- The Snapshot is unclear.
- You need to capture a new image after changing HDR.
Retake updates only the background image. It does not change the design.
¶ 4.4 HDR
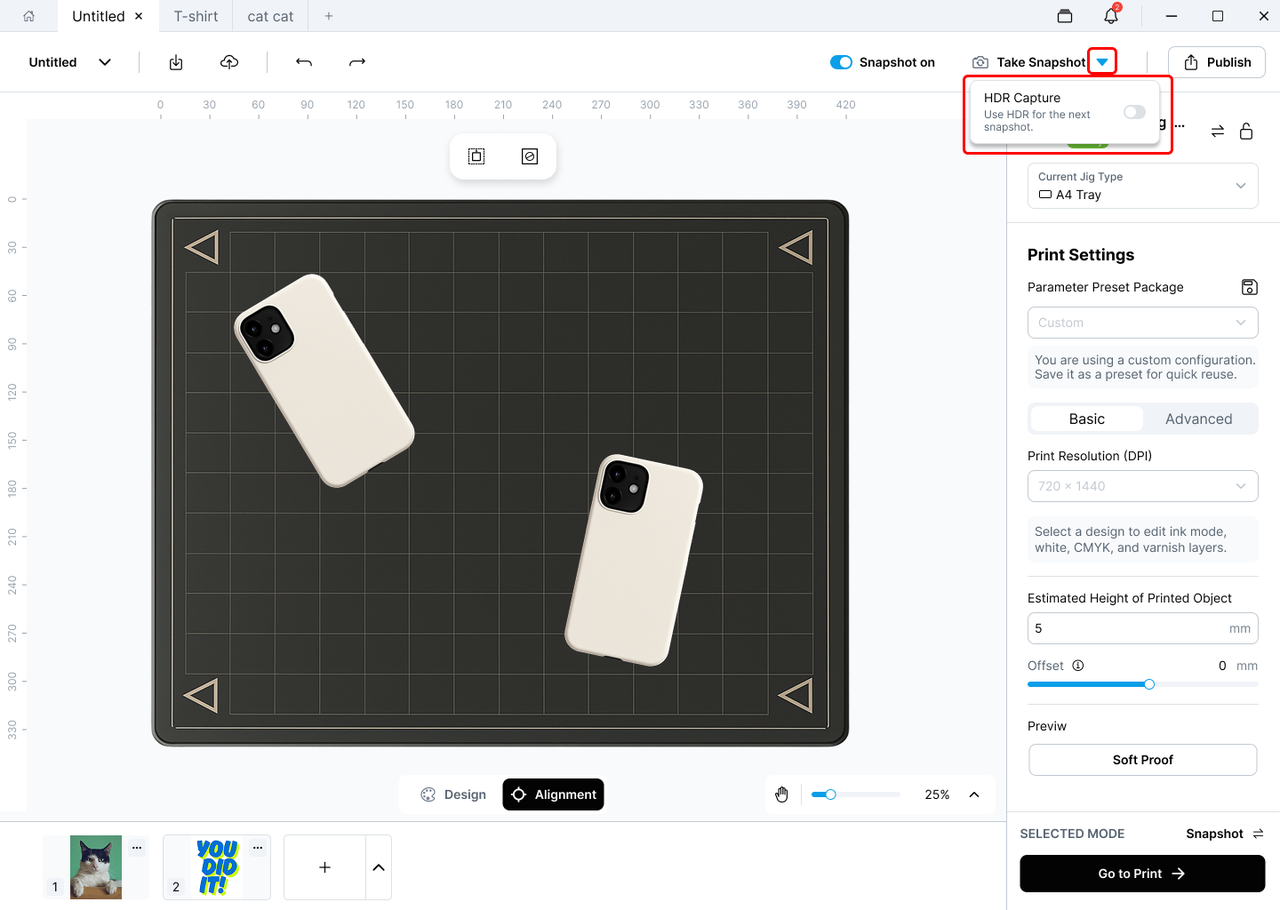
HDR Capture combines images with different exposures to improve details in bright and dark areas.
HDR may help with:
- Metal, glass, or reflective materials
- Dark or black objects
- High-contrast lighting
- Objects with unclear edges in a standard Snapshot
Note
HDR is turned off by default. After changing the HDR setting, take a new Snapshot.
HDR affects only the displayed image. It does not change the printing area, printing parameters, or final printed result.
¶ 4.5 Recommended Scenarios
Use Snapshot Alignment for:
- Flat or regularly shaped objects
- Fast manual positioning
- Workflows where you want full control over placement
- Situations where Smart Alignment cannot identify the object
¶ 5. Zero-Point Alignment
¶ 5.1 Overview
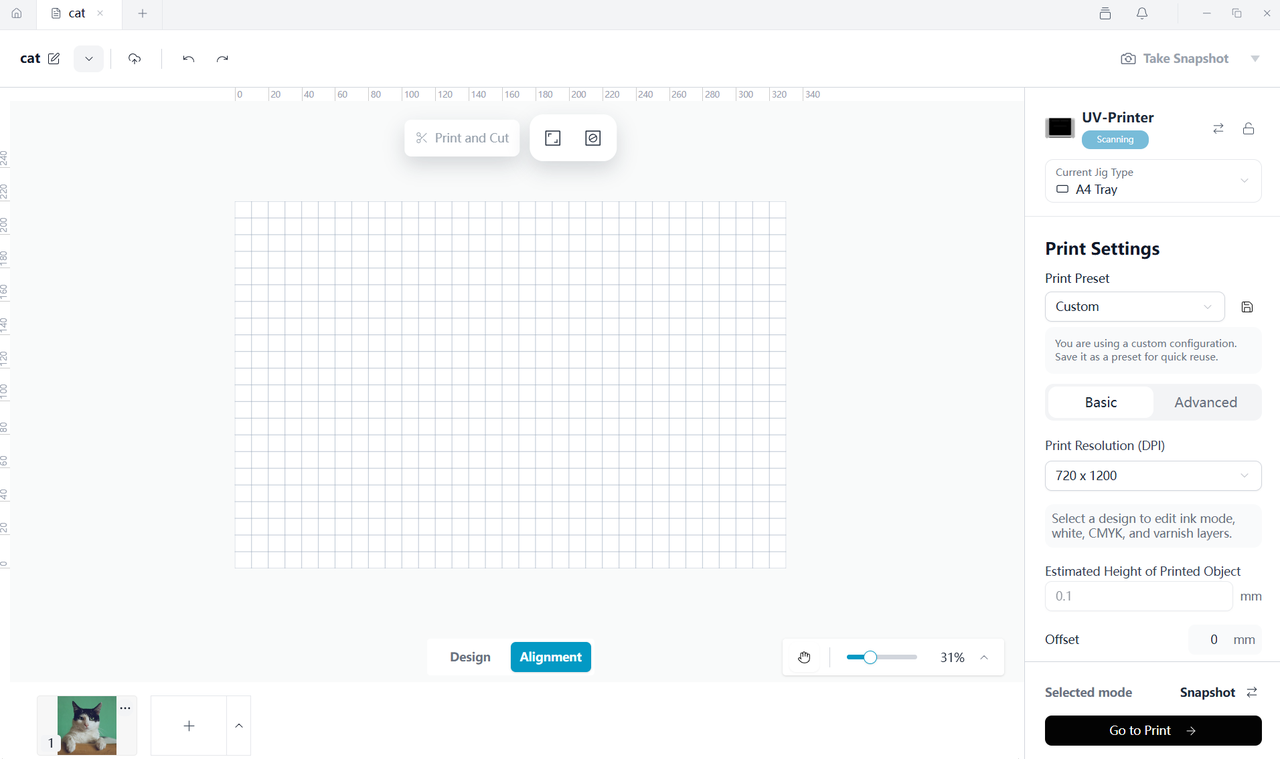
Zero-Point Alignment is a manual positioning method used when visual Alignment is unavailable.
Instead of displaying a camera image, Morpho Studio shows a coordinate grid representing the printbed. The lower-left corner of the printbed is the (0,0) origin.
Use the physical printbed markings together with the coordinate system to position the design.
¶ 5.2 When It Is Used
Zero-Point Alignment may be used when:
- Smart Alignment and Snapshot Alignment cannot be completed.
- The Snapshot fails to load.
- Snapshot is manually turned off.
- A camera or visual height-measurement error occurs.
- Snapshot is still loading and the coordinate grid is shown temporarily.
While Snapshot is loading, you can either wait for the image or continue using Zero-Point Alignment.
¶ 5.3 Zero Point Setup
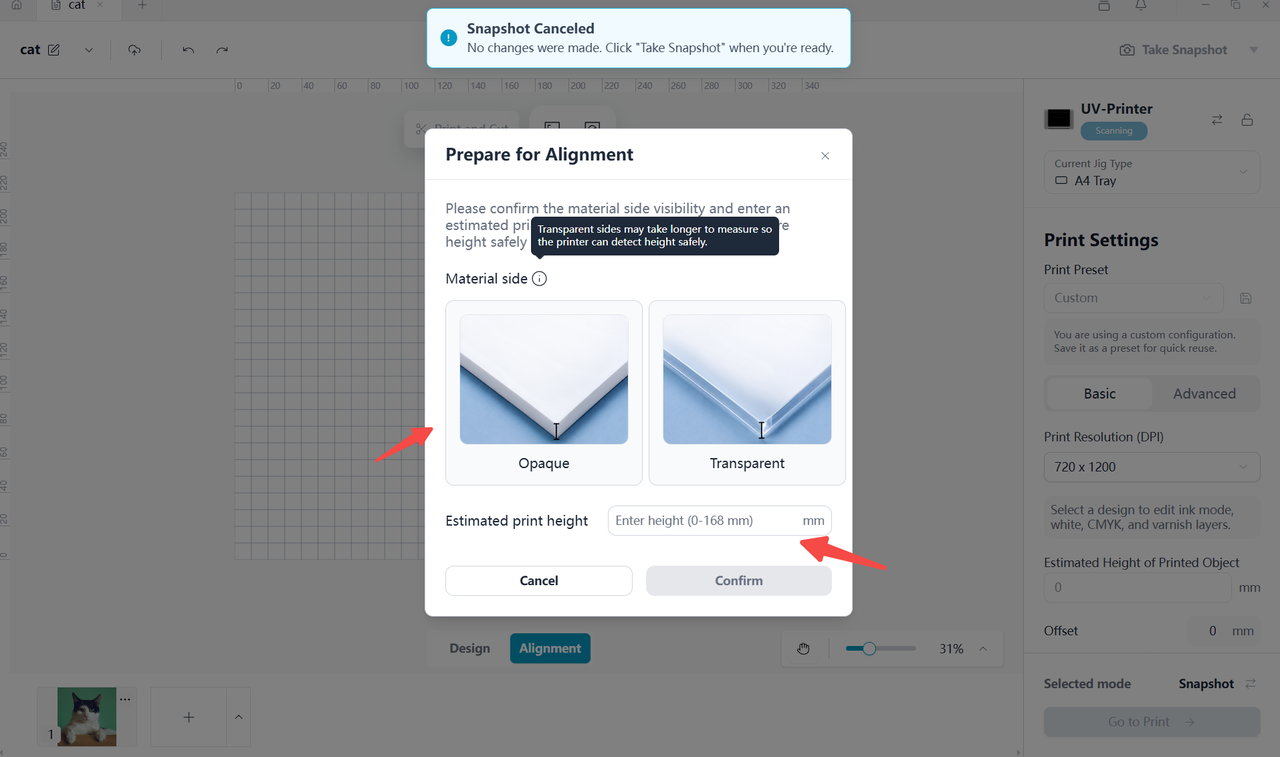
Before entering Zero-Point Alignment, configure:
- Side Transparency
- Estimated Height of Printed Object
Select Transparent when the object sides are transparent or when you are unsure.
Select Opaque when the object sides are not transparent.
The estimated height:
- Must be between 0–168 mm
- Supports one decimal place
- Should be as close as possible to the actual object height
Note
The estimated height is used to prepare laser height measurement and normally cannot be changed during the current Alignment process.
¶ 5.4 Position the Design
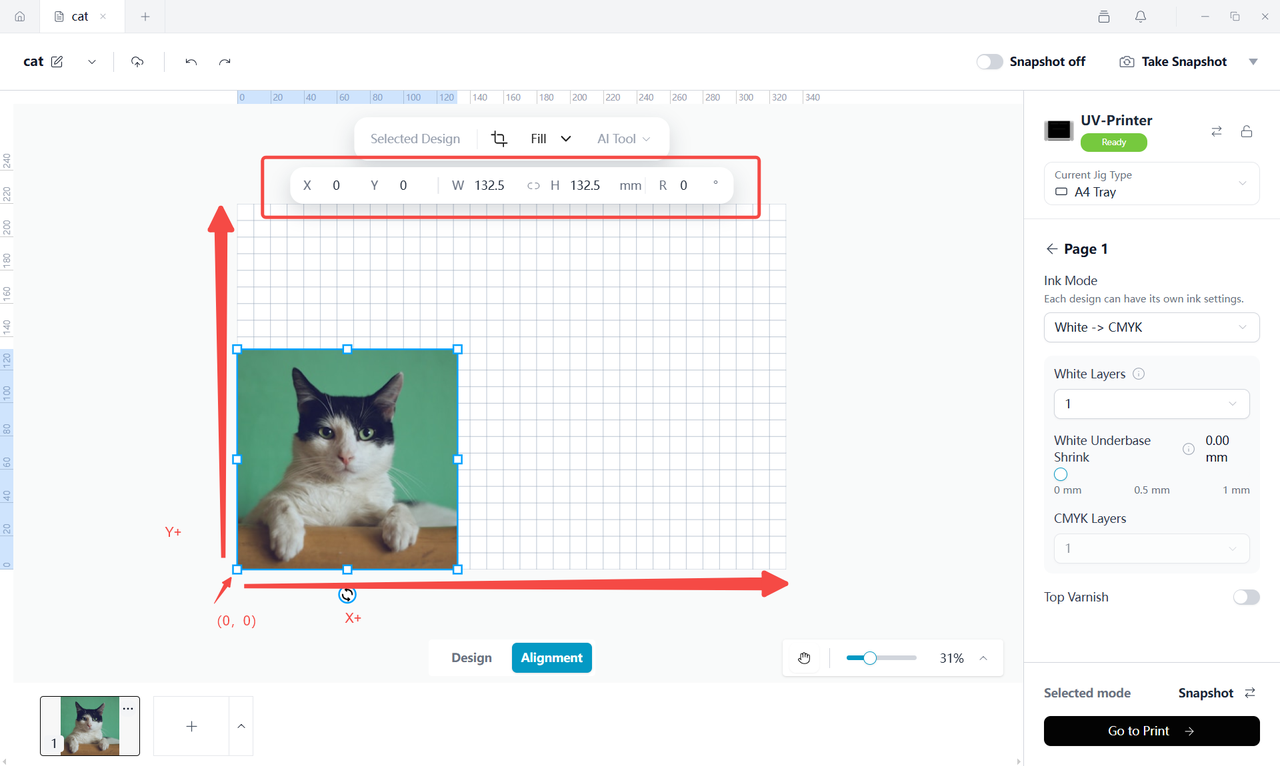
The available positioning parameters are:
- X — Horizontal position
- Y — Vertical position
- W — Design width
- H — Design height
- R — Rotation angle
You can drag the design on the canvas or enter exact values.
To position a design:
- Select the design.
- Adjust X and Y.
- Adjust W and H.
- Adjust R.
- Confirm that the design remains within the object, jig, and printable area.
Tip
Numerical input is recommended when the physical position is known.
¶ 5.5 Height Measurement
The printer performs laser height measurement in the background after you enter Zero-Point Alignment.
While measurement is in progress, you can still:
- Move and resize the design
- Adjust rotation
- Edit X, Y, W, and H
- Adjust Offset
- Check the printable area
- Submit the print job
The printer completes height verification before printing begins.
¶ 6. Offset
 |
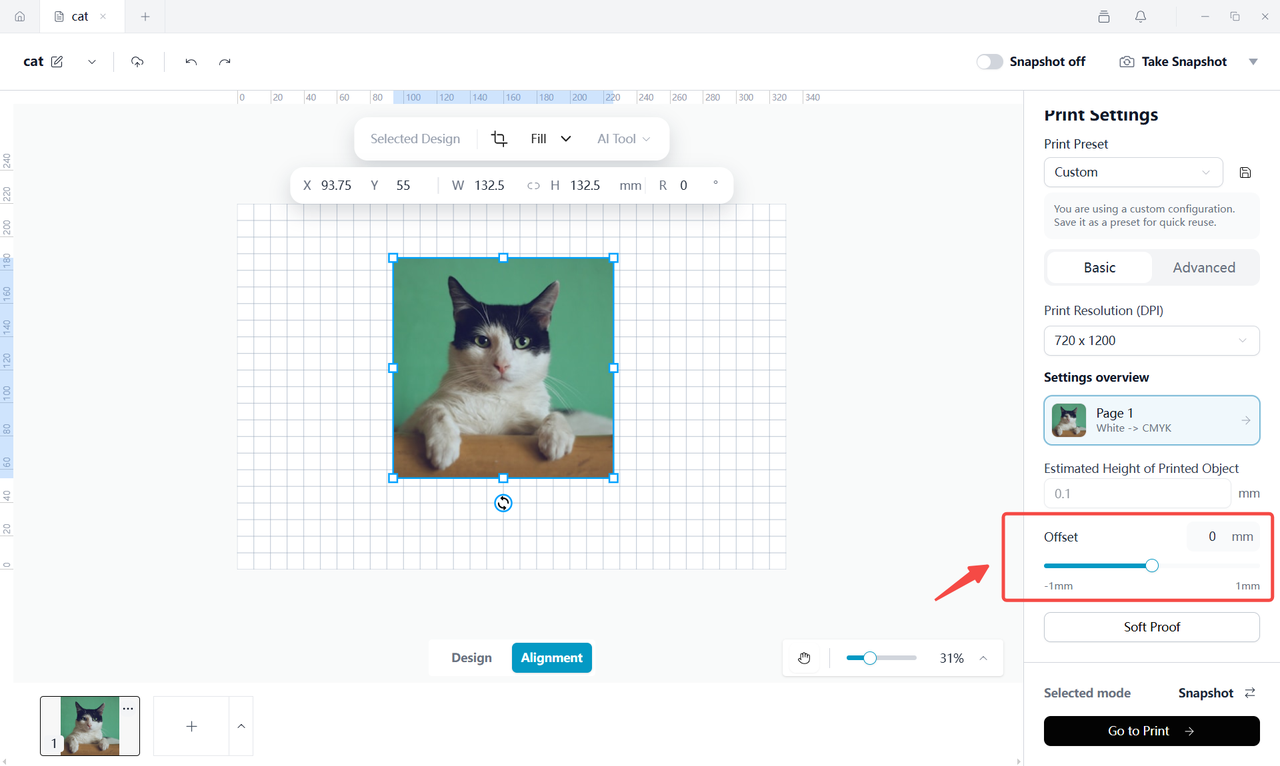 |
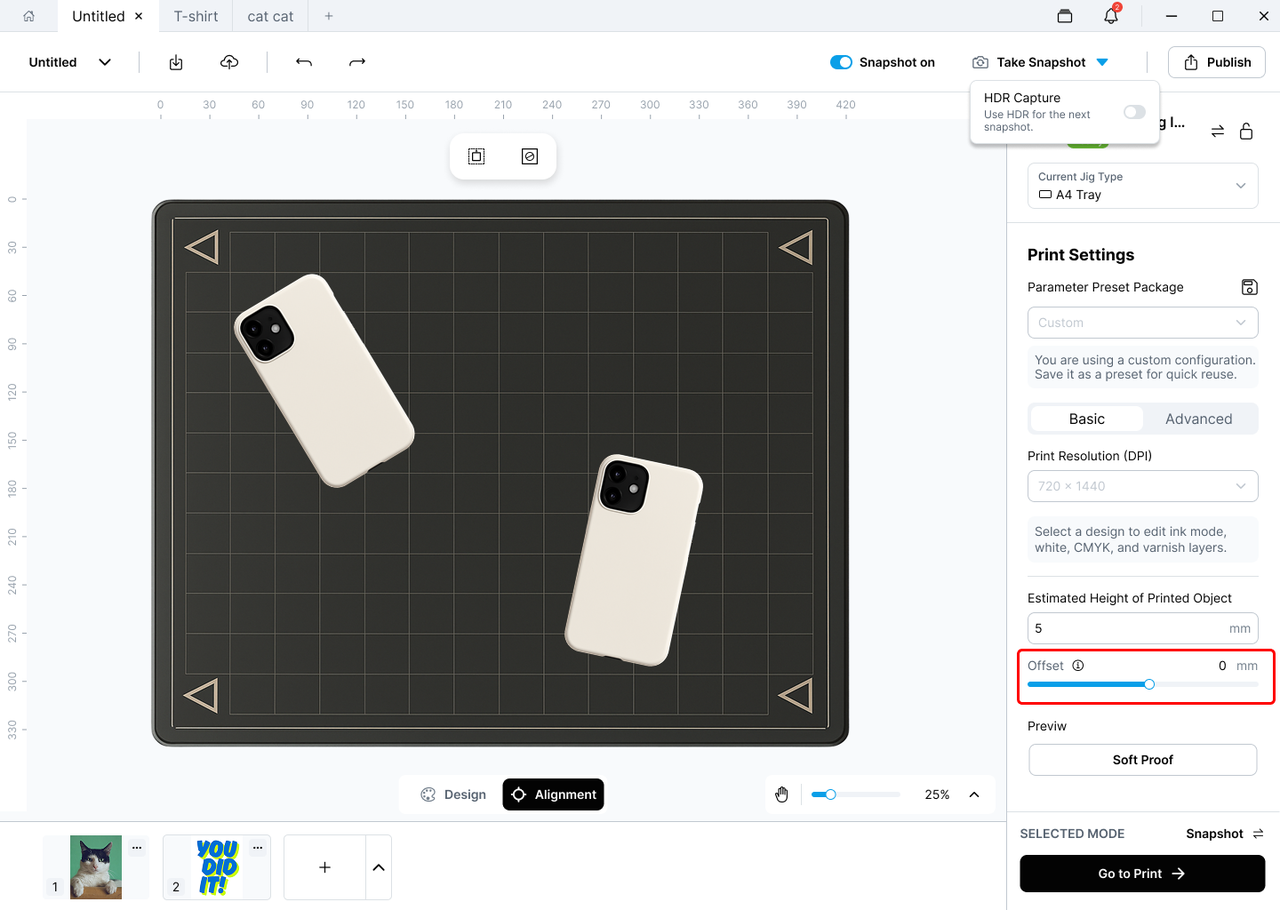
Offset fine-tunes the printing height by adjusting the distance between the printhead and the printing surface.
| Setting | Value |
|---|---|
| Default | 0 mm |
| Increment | 0.1 mm |
| Range | ±1 mm |
Keep the default value unless an adjustment is required.
The final printing height is calculated as:
Final Printing Height = Measured Object Height + Offset
Note
The supported Offset range may change with future firmware versions.
¶ 7. Switch Alignment Methods
You can switch between Alignment methods whenever another method is more suitable.
- If Smart Alignment cannot generate a reliable result, the system may recommend Snapshot Alignment.
- If Snapshot cannot be loaded, you can continue with Zero-Point Alignment without restarting the project.
After switching methods, verify the position and size of every design before printing.
¶ 8. Before Printing
Before printing, confirm that:
- The design is positioned on the correct object.
- The design size and rotation are correct.
- Important content is not too close to the object edge.
- No design extends outside the printable area.
- All objects remain in the same position used during Alignment.
- The selected printbed or jig matches the installed hardware.
- Transparent objects are configured correctly in Zero Point Setup.
- Offset remains 0 unless height adjustment is required.
¶ 9. FAQ
¶ Why is Smart Alignment recommended?
Smart Alignment automatically detects object information and reduces manual positioning, improving efficiency and placement accuracy.
¶ When should I use Snapshot Alignment?
Use Snapshot Alignment when you want faster manual control or when Smart Alignment cannot identify the object reliably.
¶ What is the difference between Snapshot Alignment and Zero-Point Alignment?
- Snapshot Alignment uses a real image of the printbed.
- Zero-Point Alignment uses only a coordinate grid, requiring manual positioning based on physical measurements.
¶ Does HDR affect the printed result?
No. HDR improves only the preview image displayed in the App. It does not affect print settings or the final printed result.
¶ What happens if the estimated object height is incorrect?
The printer performs height verification before printing. Entering a value close to the actual height can reduce measurement time.
¶ Can I edit the design after submitting the print job?
You can edit the design before submitting the print job. After submission, the printer uses the version that was sent with the job.